VMware Cloud on AWS - Part 1 - Manual Deployment
This is my first blog on Securefever, and you can read my introduction here:
https://www.securefever.com/about
In this blog post, we will cover the basics of a VMC on AWS deployment.
The blog is meant to be accessible to everyone new to VMC.
This blog series will cover requirements at both VMC and AWS levels.
Any requirement listed in this blog will include examples created in our own AWS/VMware demo environment.
My VMC environment is based on a 1-Node deployment. Keep in mind that this is not suitable for production workloads.
The expected blog series will develop over the next couple of months.
Our initial deployment will be conducted manually. We will proceed to a DevOps approach in a follow-up exercise in which we will look at an automated deployment using Terraform.
This blog series will also dive into additional services at a later stage, partially outside of the VMware/AWS ecosphere (external storage).
For those interested, I will also follow up with a series on VMware Cloud on AWS as a disaster recovery solution.
With that being said, let's jump right in!
Requirements - AWS
This series will include details and easy-to-follow instructions. However, I highly recommend acquaintance with the basics/concepts of AWS Virtual Private Clouds (VPC), Regions, and Availability Zones (AZ).
Technical requirements:
AWS Account
A VPC (in the region we want to deploy the SDDC), along with at least one VPC subnet in the AZ where we want to deploy.
Please note that like in all hyperscalers, you pay for what you use. With that in mind, setting up an account, VPCs, and Subnets are free of charge.
I encourage you to keep a cloud mindset and ensure that unused resources are powered off and that you delete all resources post the completion of your testing, as these can generate monthly charges.
I have reserved the following networks for the lab’s AWS resources. Your VPC networks do not need to reflect my selection; however, it may help you to follow along.
AWS VPC: 10.10.0.0/16
VPC Subnet AZ1: 10.10.0.64/26
VPC Subnet AZ2: 10.10.0.128/26
VPC Subnet AZ3: 10.10.0.192/26
This is just an example network that was free in our lab setup, and I use this for many different tests/resources within AWS.
The VPC network scope does not need to be a /16.
Why do I need an AWS account?
The connected VPC has VPC subnets in one or each of the available availability zones within the AWS region.
By selecting one of the VPC subnets in a specific AZ, we determine in which AZ we want the SDDC to be deployed.
Every production VMC on AWS deployment must be permitted to access a customer-owned VPC; this is referred to as a “Connected VPC” and it allows connectivity with AWS native services. The connected VPC enables customers to access services over a low-latency, high-bandwidth, AWS-managed connection. We automatically configure Elastic Network Interfaces for the above-mentioned low latency connectivity between resources in the VMC SDDC and any resources in AWS during the initial deployment. This step is optional only for environments that will be deleted prior to 60 days. Environments hosting workloads have to be connected to a shared VPC of your choice.

The ‘Connected VPC’ can be leveraged for use cases like hosting an application's database in RDS, adding load-balancing, accessing private S3 endpoints, or any of AWS' plethora of services. The ‘connected VPC’ also has the advantage of cost-free traffic to the VPC subnet in the AZ of the SDDC. This feature has the inherent benefit of lowering traffic charges, e.g. for backup costs in AWS.
We will talk about additional use cases in a future blog post.
Implementing VPC + VPC Subnets in the AWS Account
To begin we will start by deploying the VPC in our preferred region (I am using London). Please note that VMC is not available in every region. Use the following link to find an eligible region near you:
https://docs.vmware.com/en/VMware-Cloud-on-AWS/services/com.vmware.vmc-aws.getting-started/GUID-19FB6A08-B1DA-4A6F-88A3-50ED445CFFCF.html

Every VPC must include at least one subnet. I will deploy a subnet in each of the AZs. Creating subnets in all AZs simplifies the deployment and testing process should we need to route traffic into other AZs later.

I repeated the process twice to create "rf_connected_vpc_subnet2" and "rf_connected_vpc_subnet3".
My naming convention combines the letters “RF”, followed by a description.
I encourage you to follow your organizations naming convention if you have one.
If you are building your first cloud, please mind AWS’ naming convention guidelines:
https://docs.aws.amazon.com/mediaconnect/latest/ug/tagging-restrictions.html
Our efforts should deliver a VPC with three subnets.
Now that the hard work is done, let’s proceed to the fun part, the SDDC deployment:

Table of the newly created VPC subnets
Requirements - VMware / VMC
This section assumes you have a VMC organisation.
VMC requires the following information / requirements:
The AWS region we want to deploy in (the same region where we deployed the VPC)
Deployment Type (Stretched Cluster or not)
Host Type
Number of Hosts
AWS Account (‘Shared VPC’ account)
The AZ we want the SDDC to be deployed in (determined by selecting the VPC subnet in that AZ)
Management Subnet (private IP range used to host the SDDC management components, like vCenter, NSX Manager, etc.)
AWS Region:
For this exercise, I will deploy VMC in London.
Deployment Type:
This lab will only contain a 1-Node SDDC. The "Single Host" deployment is a particular deployment only meant for POCs or short testing periods.
(This lab will not demo a stretched cluster. The stretched cluster solutions are meant for businesses that require an SLA of 99,99. Please leave a comment or message me if you're interested in learning more about stretch clustering or VMC HA capabilities.)
Host Type / Number of Hosts:
1 x i3 instance.
I am happy to announce the expanded instance size and offerings now include i3en, and i4n. Follow the link below for an overview of available instance types and their specs:
https://docs.vmware.com/en/VMware-Cloud-on-AWS/services/com.vmware.vmc-aws-operations/GUID-98FD3BA9-8A1B-4500-99FB-C40DF6B3DA95.html
Please work with VMware and / or a partner to determine which host type makes sense for your organisation and workload requirements.
AWS Account:
Let's get started by connect an AWS account to your VMC organisation.
In order to do this, you need to run an AWS Cloud Formation template with an administrative user of the AWS account.
As we have already created the VPC and subnets in a specific account, we want to make sure we link the AWS account with these resources.
AWS VPC + Subnet:
After connecting to an AWS account we can select the VPC and VPC subnet.
Remember that the VPC subnet determines the AZ in which your SDDC will be running.
Management Subnet:
The management subnet is where VMC will run the management components.
For a production setup we recommend a /16 subnet from the private IP space defined in RFC 1918, but a minimum of /20 is required. Moreover, you can not choose the CIDRs 10.0.0.0/15 or 172.31.0.0/16, as these are reserved.
Note that the size of the management subnet influences the scalability of your SDDC and can not be changed after deployment. For an in-depth explanation of the management subnets, have a look at this blog post: https://blogs.vmware.com/cloud/2019/10/03/selecting-ip-subnets-sddc/
The deployment automation expects a /16, /20 or /23 (if non-production). Other ranges will not be accepted (/22 for example).
Putting it all together - deploying the SDDC
Log in to the VMC console (vmc.vmware.com):
Click on “Inventory”
Click on “Create SDDC”

Next, we configure the SDDC properties using the parameters we defined:
Name your SDDC
Select the region in which you created the ‘Connected VPC’
Select the ‘Single Host’ or desired host count.
Select the host type
Please be advised that this configuration is not recommended for operations longer than 60 days
Click on ‘Next’

Please ensure you can access or have credentials to the AWS management console to connect the AWS ‘Connected VPC’ account.
Select "Connect to AWS now," "Connect to a new AWS account"
Press "OPEN AWS CONSOLE WITH CLOUDFORMATION TEMPLATE":

This action will redirect to the AWS management console. Here we will execute the VMware-generated CloudFormation template:
Please click check the ‘I acknowledge that the AWS CloudFormation template might create IAM resources’
Press ‘Create Stack’
For more information on the permissions and or actions please visit the following link. There you will find VMware’s documented actions, roles used by the account linking, as well as the required permissions in the product documentation:

If your template is successful the results should look as follows:

We may now return to the VMC console and continue with the SDDC deployment:

The CloudFormation template allows VMC to connect to the ‘Connected VPC’ account in AWS. Please select the appropriate VPC and subnet from the dropdown:
Select the VPC
Select the subnet
Click ‘Next’

It is a good idea to perform a review and prior to making acknowledgements. If the choices look correct, we can now provide the management CIDR.
I will use 10.20.0.0/16 as the management subnet.
(If you do not provide any input, the deployment assumes the default of 10.2.0.0/16):
Provide you Management Subnet CIDR
Click ‘Next’

We are almost there. The following screen is advising us of costs and the start of the charges. Please ensure that you are ready to launch as costing starts as soon as we complete the “Deploy SDDC” process.
Click on “Charges start once your SDDC has finished deploying. Accrued charges will be billed at the end of the month.’
Click on “Pricing is per hour-hour consumed for each host, from the time a host is launched until it is deleted.’

Completion takes around 100 - 120 minutes.
With this, we conclude the first part of this blog series.
As you see, VMC might sound complicated first, but it quickly implemented with just a bit preparation.
In the next post, we will get dirty with Terraform.
See you soon!
Terraform blueprint for a Horizon7 Ruleset with VMC on AWS
In this blog post I will write about Terraform for VMC on AWS and NSX-T provider. I wrote over 800 lines of code, without any experience in Terraform or programming. Terraform is super nice and easy to learn!
First of all, all my test ran at a lab platform… Use following code at your own risk, I won't be responsible for any issues you may run into. Thanks!
We will use following Solutions:
Terraform Version 0.12.30
VMC on AWS
Terraform NSX-T provider
If you are completely new to Terraform, I highly recommend to read all Blog posts from my colleague Nico Vibert about Terraform with VMC on AWS. He did a awesome job in explaining!
So, what will my code do..?
My code will create several Services, Groups, and distributed firewall rules. All rules are set to "allow", so you shouldn't have any impact when you implement it. It should support you to create a secure Horizon Environment. After you applied it, you can fill all created groups with IPs/Server/IP-Ranges. But details later!
Before we start we need following Software installed:
My Repository can be cloned from here. I will skip the basic installation for git, go and terraform. I will jump directly to my repository and continue there.
First of all we need to clone the repository, open a terminal Window and use following command: git clone https://github.com/vmware-labs/blueprint-for-horizon-with-vmc-on-aws
tsauerer@tsauerer-a01 Blueprint_Horizon % git clone https://github.com/xfirestyle2k/VMC_Terraform_Horizon
Cloning into 'VMC_Terraform_Horizon'...
remote: Enumerating objects: 4538, done.
remote: Counting objects: 100% (4538/4538), done.
remote: Compressing objects: 100% (2935/2935), done.
remote: Total 4538 (delta 1459), reused 4520 (delta 1441), pack-reused 0
Receiving objects: 100% (4538/4538), 23.88 MiB | 5.92 MiB/s, done.
Resolving deltas: 100% (1459/1459), done.
Updating files: 100% (4067/4067), done.
CD to the blueprint-for-horizon-with-vmc-on-aws/dfw-main folder, with following command: cd blueprint-for-horizon-with-vmc-on-aws/dfw-main
tsauerer@tsauerer-a01 VMC_Terraform_Horizon % ls -l
total 88
-rw-r--r--@ 1 tsauerer  staff   1645 Jun 10 10:04 README.md
-rw-r--r--@ 1 tsauerer  staff  30267 Jun  9 10:45 main.tf
-rw-r--r--@ 1 tsauerer  staff    172 May 29 08:35 vars.tf
tsauerer@tsauerer-a01 VMC_Terraform_Horizon %
Let's test if Terraform is installed and working correctly, with "terraform init" we can initialize Terraform and provider plugins.
tsauerer@tsauerer-a01 VMC_Terraform_Horizon % terraform init

Initializing the backend...

Initializing provider plugins...

Terraform has been successfully initialized!

You may now begin working with Terraform. Try running "terraform plan" to see
any changes that are required for your infrastructure. All Terraform commands
should now work.

If you ever set or change modules or backend configuration for Terraform,
rerun this command to reinitialize your working directory. If you forget, other
commands will detect it and remind you to do so if necessary.
Success, Terraform initialized succesfully. Next we need to check if we have the correct nsxt-provider.
tsauerer@tsauerer-a01 VMC_Terraform_Horizon_Backup % t version
Terraform v0.12.24
+ provider.nsxt v2.1.0
Great, we have the nsxt provider applied.

I recommend to use Visual Studio Code or Atom, which I'm using.
I created a new Project in Atom and select the folder which we cloned from github.
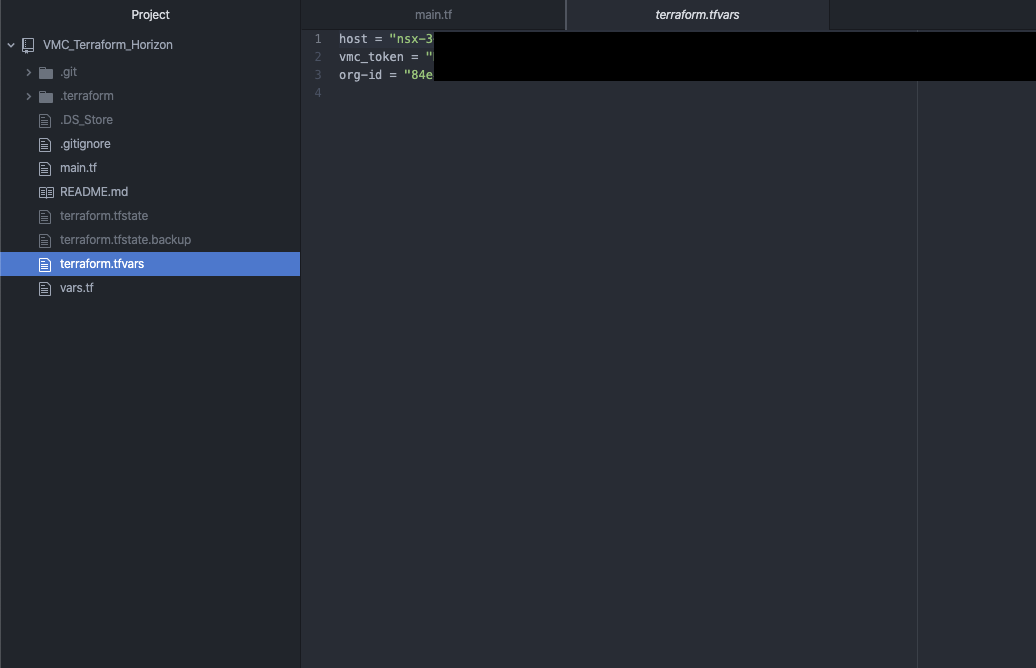
3 Files are importent, first "main.tf", here you can find the code or what will be done.

"Vars.tf", a description file for variables.

And the most importent file, which we have to create, because there, you will store all your secrets "terraform.tfvars".
So what you have to do now, you need to create a new file and name it "terraform.tfvars". For NSX-T we only need 3 variables, we already saw them in the "vars.tf" file. So let's add
Host = ""
Vmc_token = ""
Org-id = ""
Don’t worry I will guide you where you can find all the informations. Let's find the Host informations. “Host” is kind of missleading in the world of VMware, what we need here is the NSX-T reverse proxy. Let's go to your SDDC and on the left side you can find "Developer Center"

Go to "API Explorer" choose your SDDC which you want to use and go to "NSX VMC Policy API". On the left the "base URL" is your NSX-reverse proxy URL.

Copy the URL and paste it to your "terraform.tfvars" file between the quotation marks. Here a small hint, because it took me some hour troubleshooting, you have to remove the "https://".. So it starts just with "nsx……..”
Host = "nsx-X-XX-X-XX.rp.vmwarevmc.com/vmc/reverse-proxy/api/orgs/84e"

Next we need our API Token. This token is dedicated to your Account, to create one, go to the top right, click on your name and go to "My Account".
On the last tab "API Token", we need to generate a new API Token.

Enter a Name, TTL period and your scope. I guess you only need "VMware Cloud on AWS" "NSX Cloud Admin", but I am not sure. My token had "All Roles". Generate the token, copy your generated token and safe it in a safe place! You will not be able to retrieve this token again.
vmc_token = "XXXXXXXXXXXXXXXXXXXXXXXXXXXXXXX"
Last we need the org-id. Just go to one of your SDDCs and look at the "support" tab, there you can find your org-id.
org-id = "XXXXXXXXX-XXXX-XXXX-XXXX-XXXXXXXXX"
If you working with github, I would recommend to create a .gitignore and add "terraform.tfvars", so it will not be uploaded to your repository. Take care about this file, all your secrets are inside :)! In the end your file should have 3 lines:
Host = "nsx-X-XX-X-XX.rp.vmwarevmc.com/vmc/reverse-proxy/api/orgs/84e"
vmc_token = "XXXXXXXXXXXXXXXXXXXXXXXXXXXXXXX"
org-id = "XXXXXXXXX-XXXX-XXXX-XXXX-XXXXXXXXX"
Perfect, we finished the preparation! We are ready to jump into "main.tf" file.
I creating 24 Services, 16 groups and 11 Distributed Firewall Sections with several Rules, in the end you will need to fill the groups with IPs/Ranges/Server. I only focused on Horizon related services, groups and firewall rules yet, so if you want to have a allowlist firewall enabled, you have to add core Services, Groups and Firewall Rules like DNS, DHCP, AD etc. I will try to keep on working on my code to add all necessary stuff for a allowlist firewall ruleset, but for now it should give you a idea how to do it and support your work.
But lets start to plan and apply the code. If you closed your Terminal window, reopen the terminal window, jump to our location and re-initialize terraform, with “terraform init”.
With the command “terraform plan” you can review everything what terraform wants to do and also you can check if you created your secret file correctly.

you can see terraform wants to create a lot of stuff. With “terraform apply” you will get again everything what terraform wants to create and you need to approve it with “yes”. Afterwards you fired “yes”, you can lean back and watch the magic.. After some seconds you should see: Apply complete! Resources: XX added, 0 changed, 0 destroyed.

Let’s take a look into VMC after we applied our changes. First of all we created groups…. and we got groups!

next we need to check services…. and we got services as well!

Now we come to our Distributed Firewall. Bunch of sections are created with several Rules in each section. I only created allow rules and all groups are empty, so no rule should impact anything!

Success :)! We applied Groups, Services and several Rules including Groups and Services. If you have any trouble or think you want to get rid of everything what Terraform did, you can just simple go back to your terminal and enter “terraform destroy”. It will check your environment what changed or what needs to be deleted, and give you a overview what terraform wants to/will do. Approve it with “yes” and all changes will be destroyed. It take some seconds and you will see: Destroy complete! Resources: XX destroyed.

If you have any questions, problems or suggestions feel free to contact me!
Some ending words about Terraform.. Terraform is a awesome tool in the world of automation.. I had no experience with programming but it took me one or two weeks to get into it and I had so much fun to write this code! It is super easy and super useful! I hope this code will help you, save you work and will provide you as much fun as I had :).
Integration Druva Phoenix Cloud to VMC on AWS
Updated: June 16th 2020
This blog post is ONLY a showcase. I want to show you, how easy a SaaS Backup Solution can be! We will securely implement it and backup a VM.

In this showcase we will use following Solutions:
Druva Phoenix SaaS Backup Solution
VMware Cloud on AWS
Distributed Firewall
About Druva:
Druva is a software company specialized on SaaS-based data protection in one Interface. It is build and born in the AWS Cloud. One of the Product is Phoenix Cloud. Let's talk about some benefits from Phoenix Cloud afterwards we will directly jump in and get deeper into Phoenix Cloud.
Phoenix backup everything in S3
Phoenix automatically archive older Backups to Glacier
You only pay for Storage you consuming after deduplication and compression
One Console for all Backups around the world
Up to over 15 Regions where Phoenix Cloud is available
And that are just a few benefits.
Let's dive in..
After we login to the Phoenix Cloud, the Console, is a very clean overview about your consumption and your environment. Druva provides a secure, multi-tenant environment for customer data, each customer gets a virtual private cloud (tenant). All data will be encrypted using a unique per tenant AES-256 encryption key. Above and beyond all security features what Phoenix Cloud provides, let's not forget about Druva is build in AWS. AWS provide significant protection against network security issues. You will find the full whitepaper about security here!

The first thing what we want to do, create a new Organization. It can be because of separate Departments, Regions etc. By the way Druva got a great permission management, each department can take care about there own Backups.
To create a new Org. we have to go to Organization and on the top left "Add New Organization", Name it and you created your first Org!

Afterwards go to your Org and Druva through you directly into a "Get Started”. We need to select a product, in our case VMware Setup.

Next we need to download the Backup Proxy, because we want to install it on VMC on AWS we need to download the standalone Backup Proxy. Keep on track, there’s something coming soon ;).
While the download is running we need to generate a new activation token for the installation of the proxy. You can set the count how many proxies you want to install and an expire time.

Copy your token, you will need it for the installation.
Now, before we can start to deploy the Proxy we need to check the network on VMC. Let’s go to the Compute Gateway Firewall first.
Druva Proxy needs 443 access to the vCenter and Internet access. So we create following rule on the compute Gateway:
Source: Druva-Proxy -> Destination: vCenter with Port: 443
Source: Druva-Proxy -> Destination: Any with Port: 443 applied to: internet interface

On the Management Gateway we need to open Port 443 as well. In- & Outbound.

Druva only needs access to the internet and to the vCenter, so why we shouldn't not restrict all other communication.
I wrote a Terraform script to automate this step, it will create groups, service and a distributed firewall section with 4 allow rules and 2 disabled deny rules. Repo can be found here. You just have to fill the created groups (Druva_Proxy, Druva_Cache & if needed SQL-Server).
All my test ran at a lab platform… Use above code at your own risk, I won't be responsible for any issues you may run into. Thanks!
If you prefer to do it by your own here are the manual steps:
Let's go to our Distributed Firewall.
My Demo Environment is set to blacklist. So our first Rules are:
Source: Druva-Proxy -> Destination: ANY with Service: ANY -> Reject!
Source: ANY -> Destination: Druva-Proxy with Serivce: ANY -> Reject!

Right now each traffic will be blocked directly on the vNIC of our Druva Proxy.
Perfect! Next we need to allow Internet traffic. This is trickier, because we using our internet gateway and do not using a classic proxy.
So we creating a RFC1918 Group, which includes all private IP Ranges and we need a negate selection. If you have a proxy Server just allow https traffic to your proxy, that should do the trick!
Source: Druva-Proxy -> Destination: is not! RFC1918 with Service 443 -> Allow!

Last Rules, we have to allow vCenter out- and inbound traffic. So we need 2 additional rules:
Source: Druva-Proxy -> Destination: vCenter with Service 443 -> Allow!
Optional you can add ICMP.
Source: vCenter -> Destination: Druva-Proxy with Service 443 -> Allow!

That’s pretty much it, our Application Ruleset! What we could do on the Infrastructure DFW Level, we could allow basic stuff like DNS etc. But Druva do not need anything else!
I will skip the Backup Proxy installation, it is pretty straight forward, choose Public Cloud, VMware Cloud on AWS and do the basic setup, like IP, Token , NTP, vCenter and your VMC credentials.
After the deployment is done, you will see your vCenter & VMs in Phoenix Cloud and also your Backup proxy is gathered in a Proxy Pool. With the latest version of the Backup proxy we are able to deploy new Proxies directly out of our Phoenix Console! Just go to your Backup Proxy Pool and hit deploy Proxies.

Choose your DataCenter & your Backup Proxy Pool, add as much as you want.
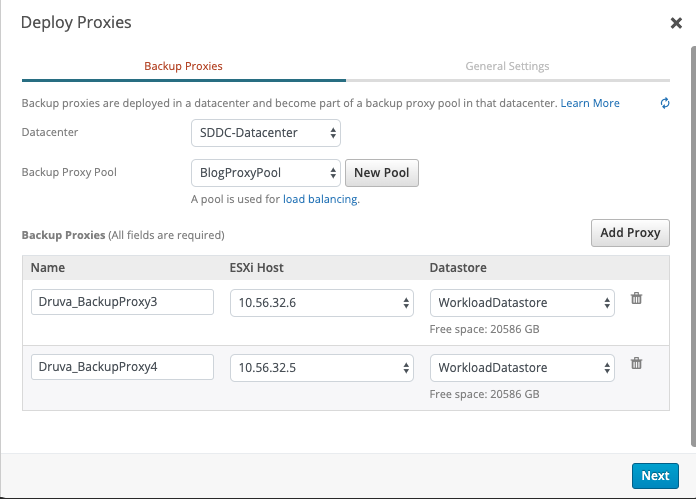
Configure the VM Network, a IP Range, Netmask, gateway and DNS Server. In my case I do not need any Proxy settings, if you using a Proxy just enable "use web proxy" and provide your information. Don't forget to add your newly deployed Proxies to your Firewall Group in VMC!

Now we have to create our first Backup Policy. You can find your Backup Policies via Manage -> Backup Policies. Let's create our own Policy with custom settings.

Create new Backup Policy -> VMware. First of all name it and write a description.

Schedule it, in our case each day at 02:00 am. Duration and your max bandwidth. You can separate weekdays and weekend, like me. On Weekend nobody works, so I extended the duration timer. It makes sense to ignore backup duration for the first backup. But I guess you know your Environment better than me.

Retention, in my case daily for 30 days, weekly for 24 weeks, monthly for 12 months and yearly snapshots for 10 years. Set it depending on your workload. I also enabled LTR (Long Term Retention). LTR automatically move all cold tier backups to Glacier.

Next some specific VMware Settings. Auto-enable CBT, VMware tools quiescing and application-aware processing.

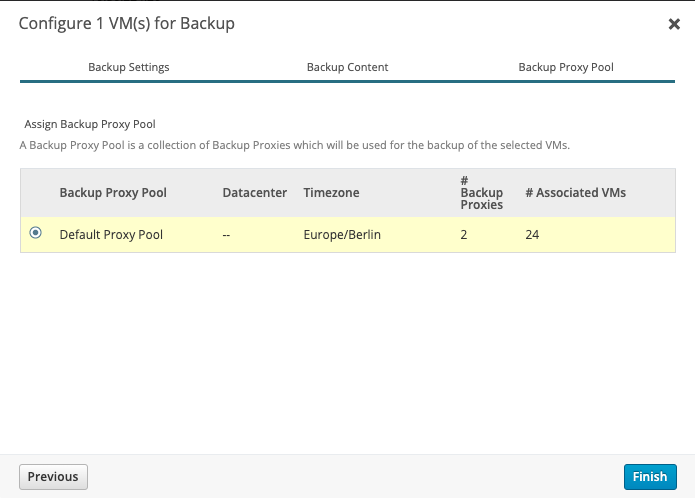
That's it! Meanwhile you should notice in your Phoenix Cloud Console, your Proxy communicates with Druva Phoenix Cloud and you see some Information of your vCenter. Next we need to configure VMs for Backup. Let's go to Protect -> VMware. Here you have an overview of # Total VMs, Configured VMs and your Backup Proxy Pools/# Backup Proxies.

To configure a VM we go to your vCenter/Hypervisor and select 1 or multiple VMs and select Configure VM for Backup.

Choose your Storage, in my case eu-central 1 (Frankfurt DataCenter) a Administrative Group (useful to organize/management purpose) and your Backup Policy what we created earlier. In my case BlogPolicy, if you have more Backup Policys, you always can see the Details after selecting a Backup Policy.

Next, you can exclude disk names, in my case we do not exclude disks, as an example could be useful for Database Server.

Select your Backup Proxy Pool and you good to go. Your Virtual Machine is now configured!
You will find your VM in "Configured Virtual Machines". To test it lets start a backup now. Select it, hit "Backup Now" and choose yes you really want to start now.

You will find your Job in Jobs -> VMware.

For detailed information you can press the Job ID and you can see a Summary and Progress Log, if something went wrong you can also download detailed logs here.

Above you can see the result! Our first Backup of our VM, we transferred nearly 19GB, with a speed of 196 GB/hr and the Backup Duration was under 10 minutes.
Some closing words, Druva Phoenix Cloud is a great SaaS Backup Solution! It is easy to use and on the other hand very detailed. Druva engineered a next-gen solution, which brings the backup world to the next Level.
I had the chance to get in contact with pre-sales, sales, support, engineering and product management. It was a pleasure for me, you felt in each of them, the love and passion for the product/solution.
Special Thanks to Martin Edwards, Saurabh Sharma, Anukesh Nevatia and the rest of the Druva Team!