
VMware by Broadcom Explore Las Vegas Network & Security Sessions 2025
VMware Explore US will taken place in Las Vegas from 25th of August until 28th of August 2025. The european conference will not been taken place anymore in Barcelona:-( Instead of it there will be several VMware Explore Tours in Mumbai, London, Paris, Sydney, Tokyo and Frankfurt, please check this link for more informations.
I provide recommendations within this blog post about some technical sessions related to Network & Security topics for the Explore event in US. I have excluded certifications, Hands-on-Labs and Meet the Expert Roundtable sessions from my list. I have focused on none 100 level sessions, only in case of new topics I have done some exceptions.
Pricing
A full event pass for VMware Explore costs $ 1.995 dollar for the Las Vegas event. If you register onsite it costs $ 2.195 dollar. The full event pass has following advantages:
Full Event passes provide the following benefits:
General Session Access
Access to the Meeting center, needs to be scheduled as needed for attendees by a Broadcom representative.
Session & LAB Access
Session & LAB Scheduling
On-Demand Sessions
Certification Exam (includes one coomplimentary VCF certification voucher)
The Party
Event Meals
Explore Backpack and T-Shirt
VMware Explore Session Recommendations
Now I come to my session recommendations which are based on my experience and some very good known speakers from the last years and about topics which I am interested from Network and Security point of view. But first I have to say that every VMware Explore session is worth to join and customers, partners and VMware employees have taken much efforts to prepare some very good content. For me the VMware Explore sessions are the most important source to get technical updates, innovation and training. All sessions can be also watched after VMware Explore. Some hints to the session ID`s, the letter in bracket like NSLT1545LV stands for N = Network, S = Security, L = Load Balancing and T = Track. LV indicated that it is a session in Las Vegas.
General Solution Key Note
Application Network & Security (ANS) Solution Key Note
Security Sessions
Security Reference Design For VMware Cloud Foundation [NSLB1836LV]
From Zero to Hero: VMware vDefend Advanced Threat Prevention Deployment Best Practices [NSLB1869LV]
Unified Security Policy Orchestrator For Self-Service With Governance [INVB1440LV]
Safeguard Your Containers And VMs With VMware vDefend in VMware Cloud Foundation [NSLB1552LV]
Ready To See What Happens When Zero Trust Just Clicks? [NSLB1193LV]
Demystifying VMware vDefend Distributed Security Within VMware Cloud Foundation [NSLB1076LV]
VCF Sessions - Networking related
Adopting VMware NSX With VMware Cloud Foundation The Easy Way [CLOB1579LV]
Easy Set Up Networking in vCenter With VPC - Watch It Live In Action [CLOB1511LV]
New To VMware Cloud Foundation Networking With VMware NSX? [CLOB1512LV]
VMware Cloud Foundation Networking Operations And Troubleshooting Best Practices [CLOB1892LV]
VMware AVI Load Balancer related
Avi Load Balancer Integration With VCF 9: Driving Private Cloud To New Heights [NSLB1723LV]
Avi, AKO, and AMKO: Easy Way to Build Load Balancer Services for Kubernetes Clusters [NSLB1677LV]
Self-Service Automation With VMware Avi Load Balancer [NSLB1194LV]
VCF Compliance Sessions
Faster Audits: Regulatory Compliance With VMware Cloud Foundatio 9.0 [CLOB1260LV]
What Is New In VMware Cloud Foundation 9.0 Security And Compliance [CLOB1261LV]
Networking & Security Session AI related
Generative AI: Addressing Security And Resiliency Concerns [NSLP2051LV]
Elvate Threat Investigation For vDefend VCF Workloads With The GenAI Intelligent Assist [NSLB1596LV]
Unlocking Innovation In Regulated Industries: Sovereign Clouds And Private AI [CLOB1464LV]
Will AI Really Revolutionize Network Operations? [CLOB1883LV]
Network & Security Operational related
”Dogfooding” Broadcom Software For Internal Security [NSLB1820LV]
VMware vDefend Distributed Firewall Operational Overview [NSLB1623LV]
Rightsizing Your Private Cloud For Maximum Economic Value [CLOB1236LV]
Summary
Please take into account that there are a lot of other interesting VMware by Broadcom Explore sessions, also for many other topics like VCF 9, AI, cloud, Edge, Container, vSphere, etc.
Feel free to add comments below if you see other mandatory sessions in the Network & Security area. I wish you a lot of Fun at VMware by Broadcom Explore 2025 in Las Vegas! HAPPY NETWORKING!

VMware (by Broadcom) Explore Barcelona Network & Security Sessions 2024
VMware (by Broadcom) Explore EMEA will taken place in Barcelona from 4th of November to 7th of November 2024. It will be the first european conference under the flagship from Broadcom. For this reason there will be additional sessions from other Broadcom business groups like Symnatec, Brocade, DX NetOps, etc. I provide recommendations within this blog post about some technical sessions related to Network & Security topics for the Explore event in US. I have excluded certifications, Hands-on-Labs and Meet the Expert Roundtable sessions from my list. I have focused on none 100 level sessions, only in case of new topics I have done some exceptions.
Pricing
A full event pass for VMware Explore costs 1.675 Euro for the EMEA event. If you register onsite it costs 1.875 Euro. The full event pass has following advantages:
Full Event passes provide the following benefits:
Four days of sessions including the general session, breakout sessions, roundtables and more, with content tailored to both the business and technical audiences
Destinations, lounges and activities such as The Expo and Hands-on Labs
Admittance to official Explore evening events including The Party and events in The Expo
Exclusive Explore swag
Attendee meals
Your full event pass registration allows you to purchase VMware Certified Professional (VCP) and VMware Certified Advanced Professional (VCAP) certification exam vouchers at a 50 percent discount (exams must be taken onsite during Explore Las Vegas).
VMware Explore Session Recommendations
Now I come to my session recommendations which are based on my experience and some very good known speakers from the last years and about topics which I am interested from Network and Security point of view. But first I have to say that every VMware Explore session is worth to join and customers, partners and VMware employees have taken much efforts to prepare some very good content. For me the VMware Explore sessions are the most important source to get technical updates, innovation and training. All sessions can be also watched after VMware Explore. Some hints to the session ID`s, the letter in bracket like VCFB1877BCN stands for VCF = VMware Cloud Foudation (Business Unit) and B = Breakout Session. BCN indicated that it is a session in Barcelona. Sometimes you see also an letter D behind BCN, this means that it is not a in person session, D stands for distributed. Please take into account that VMware by Broadcom has new business units:
VMware Cloud Foundation - VCF
Application Networking & Security - ANS
Modern Application - TNZ
Software-Defined Edge - SDE
And there are also “legacy” Broadcom business units like Agile Operation Division (AOD) or Enterprise Security Group (ESG) which includes Symantec.
General Solution Key Note
Advanced Network & Security (ANS) Solution Key Note
NSX Sessions - Infrastructure related
VMware Cloud Foundation Networking Performance - Deep Dive [VCFB1646BCN]
NSX VPC: The Network Consumption Model for Private Cloud [VCFB1649BCN]
VMware Cloud Foundation Infrastructure Design with VMware NSX [VCFB1260BCN]
Security Sessions
3 Cornerstones to Enable Cyber-Resilent Private Cloud [VCFB1043BCN]
Bootstraping Segmentation and Zero Trust in your VCF Private Cloud [ANSB1214BCN]
Is Your Cloud Obsuring Your Security? Let`s Turn On The Lights With VMware vDefend! [ANSB1216BCN]
Reveal your application flows with Security Intelligence [ANSB1167BCN]
Security Reference Design for VMware Cloud Foundation [ANSB1235BCN]
Demystifying Distributed Securtiy in VMware Cloud Foundation [VCFB1015BCN]
VMwarew AVI Load Balancer related
Deep Dive on VCF Application Troubleshooting with Avi App Analytics [ANSB1181BCN]
VCF Load Balancing with Self-Service: Enable DevOps at the Speed of Apps [ANSB1180BCN]
GenAI-Powered Insights in Avi Load Balancer - A Journey into Next-Gen Observability [INVB1174BCN]
Secure VCF Kubernetes Workloads with Avi Ingress and Gateway API [ANSB1179BCN]
Security Design Guide for VCF Workloads with Avi Web App Firewall [ANSB1386BCN]
Network & Security Cloud Sessions
Why Adopt VMware NSX Network Virtualization for VMware Cloud Foundation? [VCFB1877BCN]
VMware Strategic View: What`s next with VMware Cloud Foundation [VCFB1851BCN]
New to VMware NSX with VMware Cloud Foundation? This Session is For You [VCFB1647BCN]
Hardening and Securing VCF: A Multi-Layered Approach [VCFB1672BCN]
Building End-To-End Networking with Azure VMware Solution [VCFB1604BCNS]
NSX Sessions - Container related
Network Monitoring related
A customers view on What`s New in Aria Operation for Networks [VCFB1648BCN]
Secure Software-Defined Data Center Operations in Dubai Airports [VCFB1448BCN]
Four Ways to Enhance the Network Experience across Hybrid and Multi-Cloud [AOD1880BCN]
DPU (SMARTNICS)
DPUs: Your VMware Cloud Foundatoin`s Secret Weapon for Scale and Security [VCFB1641BCN]
Demystifying DPUs and GPUs in VMware Cloud Foundation [VCFB1677BCN]
Supercharge Your Workloads on VCF: Unleashing the Power of DPUs [VCFB1208BCN]
Symantec and Carbon Black Sessions
Breaking Chains: Transforming Attack Chain Analysis into Defender Strategy [ESGB1142BCN]
Beyond Protection: Moving to Proactive Threat Detection [ESGB1303BCN]
Help Your Developers Shift Left and Codify Data Protection [ESGB1141BCN]
Mastering PCI: How Positive Security Models Simplify Compliance [ESGB1302BCN]
Maximizing Data Protection and Goveranance when Implementing GenAI [ESGB1144BCN]
SD-WAN and SASE
Harness the Power of Edge AI with Edge Compute and VeloCloud SD-WAN and SASE [SDEB1336BCN]
Securing and Safeguarding Sensitive Enterprise Data with VMware VeloCloud SASE [SDEB1339BCN]
Transform Your Network with VeloCloud and Software Defined Edge [SDEB1498BCN]
Real-Life Examples and Best Practices Running SD-WAN on 4G/5G and Starlink [SDEB1326BCN]
VMware VeloCloud Inaugural State of the Edge Study [SDEB1669BCN]
When the Edge Becomes the Mainstream; What`s Next in Software-Defined Edge AI [SDEB1598BCN]
Summary
Please take into account that there are a lot of other interesting VMware by Broadcom Explore sessions, also for many other topics like VCF 9, AI, cloud, Edge, Container, vSphere, etc.
Feel free to add comments below if you see other mandatory sessions in the Network & Security area. I wish you a lot of Fun at VMware by Broadcom Explore 2024 in Barcelona!
VMware (by Broadcom) Explore US Network & Security Sessions 2024
VMware (by Broadcom) Explore will taken place in Las Vegas from 26th to 29th of August 2024. VMware Explore EMEA in Barcelona is from 5th of November to 7th of November 2024. It will be the first conference under the flagship from Broadcom. For this reason there will be additional sessions from other Broadcom business groups like Symnatec, Brocade, DX NetOps, etc. I provide recommendations within this blog post about some technical sessions related to Network & Security topics for the Explore event in US. I have excluded certifications and Hands-on-Labs and Meet the Expert Roundtable sessions from my list. I have focused on none 100 level sessions, only in case of new topics I have done some exceptions.
Pricing
A full event pass for VMware Explore costs $2,395 for the US event. If you book it before the 15th of July you get the pass $2,195. The full event pass has following advantages:
Full Event passes provide the following benefits:
Four days of sessions including the general session, breakout sessions, roundtables and more, with content tailored to both the business and technical audiences
Destinations, lounges and activities such as The Expo and Hands-on Labs
Focused programming for SpringOne
Admittance to official Explore evening events including The Party and events in The Expo
Exclusive Explore swag
Attendee meals
Your full event pass registration allows you to purchase VMware Certified Professional (VCP) and VMware Certified Advanced Professional (VCAP) certification exam vouchers at a 50 percent discount (exams must be taken onsite during Explore Las Vegas).
VMware Explore Session Recommendations
Now I come to my session recommendations which are based on my experience and some very good known speakers from the last years and about topics which I am interested from Network and Security point of view. But first I have to say that every VMware Explore session is worth to join and customers, partners and VMware employees have taken much efforts to prepare some very good content. For me the VMware Explore sessions are the most important source to get technical updates, innovation and training. All sessions can be also watched after VMware Explore. Some hints to the session ID`s, the letter in bracket like VCFB1499LV stands for VCF = VMware Cloud Foudation (Business Unit) and B = Breakout Session. LV indicated that it is a session in Las Vegas. Sometimes you see also an letter D behind LV, this means that it is not a in person session, D stands for distributed. Please take into account that VMware by Broadcom has new business units:
VMware Cloud Foundation - VCF
Application Networking & Security - ANS
Modern Application - TNZ
Software-Defined Edge - SDE
And there are also “legacy” Broadcom business units like Agile Operation Division (AOD) or Enterprise Security Group (ESG) which includes Symantec.
Advanced Network & Security (ANS) Solution Key Note
NSX Sessions - Infrastructure related
Security Sessions
Is your cloud obscuring your security? Let`s turn on the lights! [ANSB2090LV]
3 Cornerstones to enable Cyber-Resilent Private Cloud [VCFB1201LV]
Bootstraping Segmentation and Zero Trust in your VCF Private Cloud [ANSB2084LV]
Reveal your application flows with Security Intelligence [ANSB1712LV]
Security Reference Design for VMware Cloud Foundation [ANSB2240LV]
Best Practices to reduce the attack surface of your VMware Infrastructure [VCF2148LV]
Elevate your Threat Investigation Workflow wiht the GenAI Security Co-Pilot [ANSB1911LV]
Ransomware Lessons from the field: VCF and VMware vDefend Firewall with ATP [EXPB2119LV]
VMwarew AVI Load Balancer related
Deploy Avi Load Balancer to enhance your VCF Private Cloud [ANSB1703LV]
Load Balancing at the speed of apps with automation and self-service [ANSB1835LV]
Deploy Guide for container ingress security and app security automation [ANSB2048LV]
Securing Ingress and GW API with Avi LB for any Kubernetes environment [ANSB1834LV]
Reimagining Load Balancing capabilities: NSX-T to Avi with Aria Automation [ANSB1187LV]
Best Practices on Troubleshooting and app Analytics with Avi Load Balancer [ANSB1836LV]
GenAI-Powered Insights in Avi LB - A Journey into Next-Gen Observability [INVB1702LV]
Network & Security Cloud Sessions
VMware Strategic View: What`s next with VMware Cloud Foundation [INVP1798LV]
A Vision for integrated Cyber Resiliency with VMware Live Recovery [VCFB2228LV]
Large-Scale Workload and Mobility to VCF - HCX Technical Deep Dive [VCFB1955LV]
Exploring the new capabilities and enhancements of VMware Cloud Foundation [VCFB1704LV]
Hyperlaunch: Preparing your organization for Private Cloud Hyperscaling [VCFB2055LV]
NSX Sessions - Container related
Container Security - Policy Management for Kubernetes Workloads [ANSB2225LV]
Deploy Guide for container ingress security and app security automation [ANSB2048LV]
Securing Ingress and GW API with Avi LB for any Kubernetes environment [ANSB1834LV]
Network Monitoring related
A customers view on What`s New in Aria Operation for networks [VCFB1752LV]
Designing for Network Observability with Google Cloud [AODB1919LV]
How AI-Driven NetOps by Broadcom can reduce alarm noise by 99.99 Percent [AODB2201LV]
Four Ways to Enhance the Network Experience across Hybrid and Multi-Cloud [AOD1894LV]
DPU (SMARTNICS)
Symantec Sessions
Breaking Chains: Transforming Attack Chain Analysis into Defender Strategy [ESGB1513LV]
The 2024 Ransomware Threat Landscape: What`s Fueling the Epidemic? [ESGB2326LV]
The Importance of Data Security in Data Modernization Projects [ESGB2322LV]
Transforming Data Security from Concept to Code [ESGB2178LV]
SD-WAN and SASE
When the Edge becomes the Mainstream - What`s Next in Software-Defined Edge [SDEB2199LV]
Executive Perspective: Deploying SD-WAN when lives are on the line [SDEB2088LV]
Summary
Please take into account that there are a lot of other interesting VMware by Broadcom Explore sessions, also for many other topics like AI, cloud, Edge, Container, vSphere, etc.
Feel free to add comments below if you see other mandatory sessions in the Network & Security area. I wish you a lot of Fun at VMware by Broadcom Explore 2024 in Las Vegas!
VMware Explore EMEA Network & Security Sessions 2023
VMware Explore will taken place in Barcelona from 6th to 9th of November 2023. I provide recommendations within this blog post about some technical sessions related to Network & Security topics for the Explore event in Europe. I have excluded certifications and Hands-on-Labs sessions from my list. I have focused on none 100 level sessions, only in case of new topics I have done some exceptions.
Pricing
A full event pass for VMware Explore costs $1,575 for the EMEA event. The full event pass has following advantages:
Full Event passes provide the following benefits:
Four days of sessions including the general session, solution keynotes, breakout sessions, roundtables and more, with content tailored to both the business and technical audience
Destinations, lounges and activities such as The Expo and VMware Hands-on Labs
Focused programming for SpringOne, Partner* and TAM* audiences (These programs will have restricted access.)
Admittance to official VMware Explore evening events: Welcome Reception, Hall Crawl and The Party
Exclusive VMware Explore swag
Attendee meals (Tuesday through Thursday)
Your full event pass purchase also allows you to add on VMware Certified Professional (VCP) and VMware Certified Advanced Professional (VCAP) certification exam vouchers during registration at a 50 percent discount (exams must be taken onsite during VMware Explore Las Vegas).
VMware Explore Session Recommendations
Now I come to my session recommendations which are based on my experience and some very good known speakers from the last years and about topics which I am interested from Network and Security point of view. But first I have to say that every VMware Explore session is worth to join and customers, partners and VMware employees have taken much efforts to prepare some very good content. I am also very proud that I deliver the first time a breakout session myself with my customer BWI and Simer Singh from DPU Engineering [VIB1815BCN]. Thus you will find this session on my recommendation list as well:-)
For me the VMware Explore sessions are the most important source to get technical updates, innovation and training. All sessions can be also watched after VMware Explore. Some hints to the session ID`s, the letter in bracket like NSCB2088LV stands for NSC = Network & Security and B = Breakout Session. BCN indicated that it is a Barcelona session. Sometimes you see also an letter D behind BCN, this means that it is not a in person session, D stands for distributed.
Network & Security Solution Key Note
Solution Keynote: Innovations to Accelerate Your Enterprise Cloud Transformation [CEIK2158BCN]
7 Networking and Security Principles to Deploy Apps at Cloud Speed [NSCB2051BCN]
Simplify and Secure Your Multi-Cloud Environment with NSX [NSCB2085BCN]
Security Sessions
Bulletproof Your Network: Four Steps and Best Practices to Ransomware Defense [NSCB1500BCN]
Detect Advanced Threats with VMware NSX Advanced Threat Prevention [NSCB2047BCN]
Arsenal for the Enterprise: Lateral Security with VMware NSX and Gen AI [NSCB2084BCN]
End-to-End Network Security Design with VMware NSX [NSCB1893BCN]
Project Cypress: a GenAI Powered Assistant to Triage and Remediate Security Alerts [VIB1982BCN]
Simplify Firewall Rule Management with Terraform [CODE1350BCN]
Leveraging XDR to Increase Security and Forensics in the Workplace [NSCB2026BCN]
Security Incident - Day After and Lessons Learned [NSCB1749BCN]
Best Practices for Hardening Your VMware Infrastructure [NSCB1418BCN]
How to Protect Your ESXi and vCenter from Getting Ransomware [NSCB1306BCN]
NSX Sessions - Infrastructure related
Getting Started with NSX on VMware Cloud Foundation [NSCB2048BCN]
Get Started with NSX Automation: Networking & Security Examples with Live Demos [NSCB2103BCN]
Designing a Software-Defined Network for Service Providers with VMware NSX [NSCB1417BCN]
Get Started with HCX+: Transforming Workload Migration and Mobility [NSCB2165BCN]
NSX Sessions - Operation and Monitoring related
NSX Operations and Troubleshooting Best Practices [NSCB2105BCN]
NSX Design - Optimizing NSX Performance Based on Workload and ROI [NSCB1458BCN]
DPU (SmartNICs)
Accelerated Private Cloud with VMware Cloud Foundation over NVIDIA BlueField DPU [NSCB2356BCN]
vSphere and AMD DPUs: A Software-Defined, Hardware-Accelerated Data Center [NSCB1041BCN]
Supercharge Your VDI Workloads: Unleashing the Power of SmartNICs [EUSB1770BCN]
Performance and Security Improvements with DPUs (SmartNICs) [VMTN2241BCN]
NSX Sessions - Advanced Load Balancer (AVI) related
Deploy NSX Advanced Load Balancer to Enhance Your VMware Stacks Now [NSCB1476BCN]
How VMware IT Solved Load Balancer Challenges for 10,000+ Virtual Services [NSCB1586BCN]
Using NSX Advanced Load Balancer for VMware Horizon in a Hybrid Scenario [NSCB1743BCN]
SD-WAN and SASE
VMware SD-WAN and VMware SASE: What`s New and Next? [CEIB1467BCN]
Foritfy Your Branches with Enhanced Firewall Service for VMware SD-WAN [CEIB2578]
Convergence of Network, Security and Compute at the Edge [CEIB1462BCN]
The State of the Art for Securing Internet and SaaS Applications [CEIB1463BCN]
Orange`s Next-Gen SD-WAN Automation from Implementation to Day 2 Operations [NSCB1654BCN]
NSX Customer Stories
Securing Medical Devices and Data with VMware NSX and VMware SD-WAN [CEIB2113BCN]
Migrate F5/Citrix to NSX Advanced Load Balancer - Stories from the Customer [NSCB2104BCN]
Summary
There are a lot interesting VMware Explore sessions, also for many other topics like AI, Multicloud, Edge, Container, End User Computing, vSphere, etc.
Feel free to add comments below if you see other mandatory sessions within the Network & Security area. I wish you a lot of Fun at VMware Explore 2023 and looking forward to see you in person!
VMware Explore US Network & Security Sessions 2023
VMware Explore will taken place in Las Vegas from 21th to 24th of August 2023. VMware Explore EMEA in Barcelona is from 6th of November to 9th of November 2023. I provide recommendations within this blog post about some technical sessions related to Network & Security topics for the Explore event in US. I have excluded certifications and Hands-on-Labs sessions from my list. I have focused on none 100 level sessions, only in case of new topics I have done some exceptions.
Pricing
A full event pass for VMware Explore costs $2,295 for the US event. The full event pass has following advantages:
Full Event passes provide the following benefits:
Four days of sessions including the general session, solution keynotes, breakout sessions, roundtables and more, with content tailored to both the business and technical audience
Destinations, lounges and activities such as The Expo and VMware Hands-on Labs
Focused programming for SpringOne, Partner* and TAM* audiences (These programs will have restricted access.)
Admittance to official VMware Explore evening events: Welcome Reception, Hall Crawl and The Party
Exclusive VMware Explore swag
Attendee meals (Tuesday through Thursday)
Your full event pass purchase also allows you to add on VMware Certified Professional (VCP) and VMware Certified Advanced Professional (VCAP) certification exam vouchers during registration at a 50 percent discount (exams must be taken onsite during VMware Explore Las Vegas).
VMware Explore Session Recommendations
Now I come to my session recommendations which are based on my experience and some very good known speakers from the last years and about topics which I am interested from Network and Security point of view. But first I have to say that every VMware Explore session is worth to join and customers, partners and VMware employees have taken much efforts to prepare some very good content. For me the VMware Explore sessions are the most important source to get technical updates, innovation and training. All sessions can be also watched after VMware Explore. Some hints to the session ID`s, the letter in bracket like NSCB2088LV stands for NSC = Network & Security and B = Breakout Session. LV indicated that it is in Las Vegas session. Sometimes you see also an letter D behind LV, this means that it is not a in person session, D stands for distributed.
Network & Security Solution Key Note
Solution Keynote: Accelerate Innovation and Increase Resiliency across Mulit-cloud [CEIK2755LV]
7 Networking and Security Principles to Deploy Apps at Cloud Speed [NSCB2382]
NSX Innovations to Accelerate the Multi-Cloud Journey [NSCB2088LV]
Network & Security Multi Cloud Sessions
Get Started with HCX+: Transforming Workload Migration and Mobility [NSCB2170LV]
Unlocking NSX+, Multi-Tenancy, Security and Disaster Recovery for VMware Cloud on AWS [NSCB1388LV]
Azure VMware Solution Lessons Learned: Designing, Migrating, and Operating [CEIB3043LVS]
NSX Sessions - Container related
Cloud Native Networking and Security with Antrea and NSX [NSCB1758LV]
A Step-by-Step Demo to Set Up a Test Environment for Modern Apps in 30 Minutes [NSCB2152LV]
Security Sessions
Bulletproof Your Network: 4 Steps and Best Practices to Ransomware Defense [NSCB2730LV]
Elavate your visibility in the SOC with VMware Network Detection and Response [NSCB2909LVD]
Best Practices for Hardening Your VMware Infrastructure [CSXB2105LV]
How to Protect Your ESXi and vCenter from Getting Ransomware [NSCB1121LV]
Speed Up Micro-Segmentation with Data-Driven Insights from NSX Intelligence [NSCB1264]
NSX Sessions - Infrastructure related
Getting Started with NSX on VMware Cloud Foundation [NSCB2240LV]
Get Started with NSX Automation: Networking & Security Examples and Demos [NSCB1770LV]
End-to-End Network Security Design with VMware NSX [NSCB1393LV]
Technical Introduction to the Benefits of Network Virtualization with NSX [NSCB2094LV]
NSX Sessions - Operation and Monitoring related
Mastering NSX Operations for Improved Business Continuity and Resilience [NSCB1524LV]
Optimizing NSX Performance Based on Workload and ROI [NSCB1421LV]
NSX Sessions - Advanced Load Balancer (AVI) related
Deploy NSX Advanced Load Balancer to Enhance Your VMware Stacks Now [NSCB2148LV]
*LIVE* App Security in the Real World: See the Bad Guys and Keep Them Out [NSCB2151LV]
Migrate F5/Citrix to NSX Advanced Load Balancer - Stories from the Customer [NSCB2150LV]
SD-WAN and SASE
VMware SD-WAN and VMware SASE: What`s New and Next? [CEIB2573LV]
Foritfy Your Branches with Enhanced Firewall Service for VMware SD-WAN [CEIB2578]
Convergence of Network, Security and Compute at the Edge [CEIB1276LV]
The State of the Art for Securing Internet and SaaS Applications [CEIB2569]
DPU (SMARTNICS)
NSX Customer Stories
Simplify and Secure your Multi-cloud Environment with NSX - Featuring City of Las Vegas [NSCB2092LV]
Resilient Healthcare Network Security with Micro-Segmentation and Threat Detection [NSCB1235LV]
Summary
There are a lot interesting VMware Explore sessions, also for many other topics like AI, Multicloud, Edge, Container, End User Computing, vSphere, etc.
Feel free to add comments below if you see other mandatory sessions within the Network & Security area. I wish you a lot of Fun at VMware Explore 2023!
VMware Explore (VMworld) Network & Security Sessions 2022
After two remote remote events (VMworld 2020 and 2021) the VMware events is finally back onsite. And there is also a rebrand, VMworld is renamed to VMware Explore. The event is will be taken place in the cities San Francisco (29th of August until 1st of September 2022), Barcelona (7th of November until 10th of November 2022), Sao Paulo (19th of October until 20th of October), Singapore (15th of November until 16th of November 2022), Tokyo (15th of November until 16th of November 2022) and Shanghai (17th of November until 18th of November 2022). I provide recommendations within this blog post about some deep dive sessions related to Network & Security sessions. I have excluded certifications and Hands-on-Labs sessions from my list. I have focused on none 100 level sessions, only in case of new topics I have done some exceptions.
Pricing
A full event pass for VMware Explore will be $2,195 for the US event and €1,475 for the Europe event. The full event pass has following advantages:
Full Event passes provide the following benefits:
Access to The Expo
Participation in hands-on labs
Entry to the welcome reception and hall crawl
Entry to the VMware Explore 2022 Party
Discounts on training and certification
Meals as provided by VMware Explore
VMware Explore-branded promotional item
Networking lounges
Meeting spaces available on demand
Attendance at general session and breakout sessions (Note: Some sessions require valid Partner status)
Please note: Discounts are not applicable (ex: VMUG)
VMworld Session Recommendations
Now I come to my session recommendations which are based on my experience and some very good know speakers from the last years and about topics which are interesting from Network and Security point of view. But first I have to say that every VMware Explore session is worth to join and customers, partners and VMware employees have taken much efforts to prepare some very good content. For me the VMware Explore sessions are the most important source to get technical updates, innovation and training. All sessions can be also watched after VMware Explore. I also have to mentioned at this time that I still can't get used to the new name VMware Explore. I loved the brand VMWorld:-( The recommendation are based on the US content catalog but a lot of session will be also available on the other locations. The letter in bracket like NET2233US stands for NET = Network or SEC = Security. US indicated that it is a USA session. Sometimes you see also an letter D behind US, this means that it is not a in person session, D stands for distributed.
Network & Security Solution Key Note
Network & Security Multi Cloud Sessions
Better Secure Network Connectivity Between Public and Private Clouds [NET2246BUS]
Need to Migrate Thousands of Workloads? No Problem! [MCLB1251US]
Build Global Connectivity for Your Business Using VMware Transit Connect [NETB2470US]
Designing a Secure Multi-Cloud Infrastructure with VMware and Google [SECB2398US]
NSX Sessions - Container related
Connect and Secure Your Multi-Cloud Applications with Project Antrea and NSX [NETB2255US]
Zero Trust Security and Compliance for Modern Apps [SECB2528US]
Security Sessions
Enforcing a Strong Zero-Trust Ransomware Defense [SECB1960US]
Detect Advanced Threats with VMware NSX Network Detection and Response [SECB2382US]
Deploying Full-Stack Security for Workloads with VMware Cloud Foundation [CEIB3019US]
End-to-End Network Security Design with VMware NSX [SECB2998US]
Networking and Security Analytics, and the Evolution of the NSX Platform [NETB2301US]
Defining XDR with Forrester and the XDR Alliance [SECB2360US]
NSX Sessions - Infrastructure related
Understanding Performance of Software-Defined Security [SECB2324USD]
High Availability and Disaster Recovery with Multi-Site/Multi-Cloud Networking [NETB2188US]
NSX Sessions - Operation and Monitoring related
Automated Problem Resolution in Modern Networks with DirecTV [NETB2233US]
Explore Application-Centric Networking and Security with NSX on ACI [NETB2305US]
NSX Sessions - Advanced Load Balancer (AVI) related
SD-WAN and SASE
Modernize and Monetize with VMware Multi-Cloud Edge Solutions [CEIB2432US]
A Light in the Darknet: Stopping Cyberthreats with SASE [CEIB1234US]
Evolve SD-WAN Use Cases for Enterprise, Government, Home, Cloud and Beyond [CEIB1931US]
Upgrade User Experience and Increase Productivity: SASE Powered by AIOps [CEIB1929US]
SMARTNICS - Project Monterey
Next-Gen Networking and Security Services Architecture Using SmartNIC [SECB2397USD]
Project Monterey Behind the Scenes: A Technical Deep Dive [CEIB1576USD]
Redefining the Modern Infrastructure: Evolution of Project Monterey [CEIB2894US]
Summary
There are a lot interesting VMware Explore sessions, also for many other topics like Cloud, Edge, Container, End User Computing, vSphere, Blockchain, etc.
Feel free to add comments below if you see other mandatory sessions within the Network & Security area. I wish you a lot of Fun at VMware Explore 2022!
VMworld Network & Security Sessions 2021
VMworld 2021 will be taken place this year again remotely from 5th of October 2021 until 7st of October 2021. I provide recommendations within this blog post about some deep dive sessions related to Network & Security sessions. I have excluded general keynotes, certifications and Hands-on-Labs sessions from my list. I have focused on none 100 level sessions, only in case of new topics I have done some exceptions.
Pricing
The big advantage of a remote event is that everyone can join without any traveling, big disadvantage is indeed the social engineering with some drinks:-) Everyone can register for the general pass without any costs. There is also the possibility to order a Tech+ Pass which includes additional benefits like more sessions, discussions with VMware engineers, 1 to 1 expert sessions, certification discount, etc. The Tech+ Pass costs $299, a lot of good sessions are only available with this pass. From my point of view it is worth to order this pass.
VMworld Session Recommendations
Now I come to my session recommendations which are based on my experience from the last years and about topics which are interesting from Network and Security point of view. But first I have to say that every VMworld sessions is worth to join and especially with COVID-19 this year were a lot of applications from customers, partner and VMware employees. For me are the VMworld sessions the most important source to get technical updates, innovation and training. All sessions can be also watched after VMworld.
NSX Sessions - Infrastructure related
Enhanced Data Center Network Design with NSX and VMware Cloud Foundation [NET1789]
NSX-T Design, Performance and Sizing for Stateful Services [NET1212]
Deep Dive on Logical Routing in NSX-T [NET1443]
Deep Dive: Routing and Automation Within NSX-T [NET1472]
High Availability and Disaster Recovery Powered by NSX Federation [NET1749]
Design NSX-T Data Center Over Cisco ACI Site and Multisite [NET1480]
NSX-T Edge Design and ACI Multi-Site [NET1571]
Getting Started with NSX Infrastructure as Code [NET2272]
NSX-T and Infrastructure as Code [CODE2741]
7 Key Steps to Successfully Upgrade an NSX-T Environment [NET1915]
Service Provider and Telco Software-Defined Networking with VMware NSX [NET1952]
Self-Service Will Transform Modern Networks [NET2689]
NSX Sessions - Operation and Monitoring related
NSX-T Common Support Issues and How to Avoid Them [NET1829]
Automated Problem Resolution in Modern Networks [NET2160]
Simplify Network Consumption and Automation for Day 1 and Day 2 Operations [NET2185]
Network Operations: Intelligence and Automation from Day 0 to Day 2 [NET2697]
A Guide to Application Migration Nirvana [MCL1264]
NSX Sessions - NSX V2T Migration related
NSX Data Center for vSphere to NSX-T Data Center – Migration Approaches [NET1211]
NSX Data Center for vSphere to NSX-T: Simon Fraser University Case Study [NET1244]
NSX Sessions - Advanced Load Balancer (AVI) related
Architecting Datacenter Using NSX and AVI [VMTN2861]
Best Practices on Load Balancer Migrations from F5 to VMware [NET2420]
Get the Most Out of VMware NSX Data Center with Advanced Load Balancing [NET1791]
Ask Me Anything on Automation for Load Balancing [NET2220]
Ask Me Anything on Load Balancing for VMware Cloud Foundation and NSX [NET2186]
Ask Me Anything on Automation for Load Balancing [NET2220]
NSX Sessions - Container related
NSX-T Container Networking [NET1282]
NSX-T Reference Designs for vSphere with TANZU [NET1426]
Better Secure Your Modern Applications with No Compromise on Speed and Agility [NET1730]
Bridge the Lab-to-Prod Gap for Kubernetes with Modern App Connectivity [APP2285]
Container Networking Runs Anywhere Kubernetes Runs – From On-Prem to Cloud [NET2209]
Kubernetes Security Posture Management [SEC2602]
NSX Security Sessions
Never Trust: Building Zero Trust Networks [NET2698]
Simplify Security Complexity [SEC2732]
Data Center Segmentation and Micro-Segmentation with NSX Firewall [SEC1580]
Macro- to Micro-Segmentation: Clearing the Path to Zero Trust [SEC1302]
Creating Virtual Security Zones with NSX Firewall [SEC1790]
NSX Advanced Threat Prevention: Deep Dive [NET1376]
NSX IDS/IPS – Design Studio [UX2555]
NSX TLS Inspection – Desgin Studio [UX2578]
End to End Network Security Architecture with VMware NSX [SEC1583]
Demystifying Distributed Security [SEC1054]
Visualize Your Security Policy in Action with NSX Intelligence [SEC2393]
Network Detection and Response from NSX Intelligence [SEC1882]
Addressing Malware and Advanced Threats in the Network [SEC2027]
A Tale of Two Beacons: Detecting Implants at the Host and Network Levels [SEC2587]
Mapping NSX Firewall Controls to MITRE ATT&CK Framework [SEC2008]
Network & Security and Cloud
Innovations in Securing Public Cloud [SEC2709]
Multiple Clouds, Consistent Networking [NET2389]
Radically Simplifying Consumption of Networking and Security [NET2388]
Innovations in Better Securing Multi-Cloud Environments [SEC2608]
Better Secure Network Connectivity Between Public and Private Clouds: Panel [NET2687]
Security for Public Cloud Workloads with NSX Firewall [SEC2283]
Azure VMware Solution: Networking, Security in a Hybrid Cloud Environment [MCL2404]
Cloud Workload Security and Protection on VMware Cloud [SEC1296]
Automation HCX Migrations [CODE2806]
Intrinsic Security with VMware Carbon Black
America`s Insurgency: The Cyber Escalation [SEC2670]
Anatomy of the VMware SOC [SEC1048]
Building your Modern SOC Toolset [SEC2642]
Better Secure Remote Workers with VMware Carbon Black Cloud [SEC2666]
Cloud Workload Protection, Simplified [SEC2601]
Ask the VMware Threat Analysis Unit: Common Mistakes Seen During IR [SEC2676]
Automating Ransomware Remediation with the VMware Carbon Black Cloud SDK [CODE2787]
How to Prevent Ransomware Attacks [SEC2659]
How to Evolve Your SOC with the MITRE ATT&CK Framework [SEC2664]
DDoS Deep Dive [SEC3041S]
SD-WAN and SASE
VMware SASE: What`s New and What`s Next [EDG1647]
Multi-Cloud Networking with VMware SD-WAN [NET1753]
Consuming Cloud Provider SASE Services [EDG1304]
Cloud First: Secure SD-WAN & SASE – Complete & Secure Onramp to Multi-Cloud [EDG2813S]
Deliver Reliability, Better Security and Scalability with Edge Computing and SASE [EDG2417]
VMware SD-WAN 101 and Federal Use Cases [EDG1699]
VMware SD-WAN: Real Live from the Field [NET1109]
Help Protect Anywhere Workforce with VMware Cloud Web Security [EDG1168]
Containerized Applications at the Edge Using VMware Tanzu and SASE [EDG2325]
How Healthcare is More Securely Delivering Better Patient Experiences [EDG1965]
Extend SD-WAN Visibility and Analytics with vRealize Network Insight [EDG1345]
AIOps for SASE: Self-Healing Networks with VMware Edge Network Intelligence [NET1172]
AIOps for Client Zoom Performance with VMware Edge Network Intelligence [NET1169]
SMARTNICS - Project Monterey
Project Monterey: Present, Future and Beyon [MCL1401]
10 Things You Need to Know About Project Monterey [MCL1833]
Partner Roundtable Discussion: Project Monterey – Redefining Data Center Solutions [MCL2379]
Accelerate Infrastructure Functions and Improve Data Center Utilization [NET2874S]
Summary
There are a lot interesting VMworld sessions, also for many other topics like Cloud, Container, End User Computing, vSphere, etc.
Feel free to add comments below if you see other mandatory sessions within the Network & Security area. I wish you a lot of Fun for VMworld 2021 and hopefully see you onsite again in 2022!
VMworld Network & Security Sessions 2020
VMworld 2020 will be taken place this year remotely from 29th of September 2020 until 1st of October 2020. I provide recommendations within this blog post about some deep dive sessions related to Network & Security sessions. I have excluded general keynotes, certifications and Hands-on-Labs sessions from my list. I have focused on none 100 level sessions, only in case of new topics I have done some exceptions.
Pricing
The big advantage of a remote event is that everyone can join without any travelling, big disadvantage is indeed the social engineering with some drinks:-) Everyone can register for the general pass without any costs. There is also the possibility to order a premier pass which includes additional benefits like more sessions, discussions with VMware engineers, 1 to 1 expert sessions, certification discount, etc.
VMworld Session Recommendations
Now I come to my session recommendations which are based on my experience from the last years and about topics which are interesting from Network and Security point of view. But first I have to say that every VMworld sessions is worth to join and for me it is the most important source to get technical updates, innovation and training.
NSX Sessions - Infrastructure related
Large-Scale Design with NSX-T - Enterprise and Service Providers [VCNC1838]
Enhancing the Small and Medium Data Center Design Through NSX Data Center [VCNC1400]
Deploying VMware NSX-T in Traditional Data Center Infrastructure [VCNC1766]
Logical Routing in NSX-T [VCNC1264]
NSX on vSphere Distributed Switch: Update on NSX-T Switching [VCNC1197]
NSX-T Performance: Deep Dive [VCNC1149]
Demystifying the NSX-T Data Center Control Plan [VCNC1164]
NSX Federation: Everything About Network and Security for Multisites [VCNC1178]
NSX-T Deep dive: APIs Built for Automation [VCNC1417]
The Future of Networking with VMware NSX [VCNC1555]
NSX Sessions - Operation and Monitoring related
NSX-T Operations and Troubleshooting [VCNC1380]
Deep Dive: Troubleshooting Applications Without TCPdump [VCNC1920]
Automating vRealize Network Insight [VCNC1710]
Why vRealize Network Insight Is the Must-Have Tool for Network Monitoring [ISNS1285]
Discover, Optimize and Troubleshoot Infrastructure Network Connectivity [HCMB1376]
NSX Sessions - NSX V2T Migration related
Migration from NSX Data Center for vSphere to NSX-T [VCNC1150]
NSX Data Center for vSphere to NSX-T Migration: Real-World Experience [VCNC1590]
NSX Sessions - Advanced Load Balancer (AVI) related
How VMware IT Solved Load Balancer Problems with NSX Advanced Load Balancer [ISNS1028]
Active-Active SDDC with NSX Advanced Load Balancer Solutions [VCNC2043]
Load Balancer Self-Service: Automation with ServiceNow and Ansible [VCNC1390]
NSX Sessions - Container related
NSX-T Container Networking Deep Dive [VCNC1163]
Introduction to Networking in vSphere with Tanzu [VCNC1184]
How to Get Started with VMware Container Networking with Antrea [VCNC1553]
Introduction to Tanzu Service Mesh [MAP1231]
Connect and Secure Your Applications Through Tanzu Service Mesh [MAP2081]
Forging a Path to Continuous, Risk-Based Security with Tanzu Service Mesh [ISCS1917]
NSX Security Sessions
IDS/IPS at the Granularity of a Workload and the Scale of the SDDC with NSX [ISNS1931]
Demystifying the NSX-T Data Center Distributed Firewall [ISNS1141]
NSX Intelligence: Visibility and Security for the Modern Data Center [ISNS2496]
Micro-Segmentation and Visibility at Scale: Secure an Entire Private Cloud [ISNS1144]
Best Practices for Securing Web Applications with Intrinsic Protection [ISNS1441]
Network Security: Why Visibility and Analytics Matter [ISNS1686]
Protecting East-West Traffic with Distributed Firewalling and Advanced Threat Analytics [ISNS1235]
Network & Security and Cloud
NSX for Public Cloud Workloads and Service [VCNC1168]
Cloud Infrastructure & Workload Security: VMwareSecure State & Carbon Black [ISWL2072 + 2754]
Investigate and Detect Cloud Vulnerabilites with VMware Secure State [ISCS1973]
Service-Defined Firewall Multi-Cloud Security Design [ISCS1030]
Azure VMware Solutions: Networking and Security Design & NSX-T [HCPS1576]
VMware Cloud on AWS: Networking Deep Dive and Emerging Capabilities [HCP1255]
NSX-T: Consistent Networking & Security in Hyperscale Cloud Providers [VCNC1425]
Intrinsic Security
Cloud Delivered Enterprise Remote Access and Zero Trust [ISNS2647]
Flexibly SOAR Toward API Functionality With Carbon Black [ISWS1095]
Remote Work Is Here to Stay: How Can IT Support the New Normal [DWDE2485]
Mapping Your Network Security Controls to MITRE ATT&CK [ISNS2793]
Transform Your Security to a Zero Trust Model [ISWL2796]
Intrinsic Security - VMware Carbon Black Cloud EDR
Become a Threat Hunter [ISWS2604]
Endpoint Detection & Response for IT Professionals [ISWS2690 + 2653]
VMware Carbon Black Audit and Remediation: The New Yes to the Old No [ISWS1241]
Intrinsic Security - VMware Carbon Black Workload
Intro to VMware Carbon Black Cloud Workload [ISWL2616]
Comprehensive Workload Security: vSphere, NSX, and Carbon Black Cloud [ISWL2618]
Vulnerability Management for Workloads [ISWL2617 + 2755]
Intrinsic Security - VMware Carbon Black Endpoint
Securing Your Virtual Desktop with VMware Horizon and VMware Carbon Black [ISWS1786]
VMware Security: VMware Carbon Black Cloud and Workspace ONE Intelligence [ISWS1074]
SD-WAN - VeloCloud
SD-WAN Sneak Peek: What`s New Now and into the Future [VCNE2345]
Users Need Their Apps: How SD-WAN Cloud VPN Makes That Connection [VCNE2350]
VMware Cloud and VMware SD-WAN: Solutions Working in Harmony [VCNE2347]
Seeing Is Believing: AIOps, Monitoring and Intelligence for WAN and LAN [VCNE2384]
Why vRealize Network Insight Is the Must-Have Tool for Network Monitoring [ISNS1285]
VMware SD-WAN by VeloCloud, NSX, vRealize Network Insight Cloud [HCMB1485]
Summary
There are a lot interesting VMworld sessions, also for many other topics like Cloud, End User Computing, vSphere, Cloud-Native Apps, etc. Do not worry if you missed some presentation, the recording will be provided usually from my colleague William Lam on GitHub.
Here you can find the slides and the recording from VMworld 2019 in US and EMEA:
https://github.com/lamw/vmworld2019-session-urls/blob/master/vmworld-us-playback-urls.md
Feel free to add comments below if you see other mandatory sessions within the Network & Security area.
Terraform blueprint for a Horizon7 Ruleset with VMC on AWS
In this blog post I will write about Terraform for VMC on AWS and NSX-T provider. I wrote over 800 lines of code, without any experience in Terraform or programming. Terraform is super nice and easy to learn!
First of all, all my test ran at a lab platform… Use following code at your own risk, I won't be responsible for any issues you may run into. Thanks!
We will use following Solutions:
Terraform Version 0.12.30
VMC on AWS
Terraform NSX-T provider
If you are completely new to Terraform, I highly recommend to read all Blog posts from my colleague Nico Vibert about Terraform with VMC on AWS. He did a awesome job in explaining!
So, what will my code do..?
My code will create several Services, Groups, and distributed firewall rules. All rules are set to "allow", so you shouldn't have any impact when you implement it. It should support you to create a secure Horizon Environment. After you applied it, you can fill all created groups with IPs/Server/IP-Ranges. But details later!
Before we start we need following Software installed:
My Repository can be cloned from here. I will skip the basic installation for git, go and terraform. I will jump directly to my repository and continue there.
First of all we need to clone the repository, open a terminal Window and use following command: git clone https://github.com/vmware-labs/blueprint-for-horizon-with-vmc-on-aws
tsauerer@tsauerer-a01 Blueprint_Horizon % git clone https://github.com/xfirestyle2k/VMC_Terraform_Horizon
Cloning into 'VMC_Terraform_Horizon'...
remote: Enumerating objects: 4538, done.
remote: Counting objects: 100% (4538/4538), done.
remote: Compressing objects: 100% (2935/2935), done.
remote: Total 4538 (delta 1459), reused 4520 (delta 1441), pack-reused 0
Receiving objects: 100% (4538/4538), 23.88 MiB | 5.92 MiB/s, done.
Resolving deltas: 100% (1459/1459), done.
Updating files: 100% (4067/4067), done.
CD to the blueprint-for-horizon-with-vmc-on-aws/dfw-main folder, with following command: cd blueprint-for-horizon-with-vmc-on-aws/dfw-main
tsauerer@tsauerer-a01 VMC_Terraform_Horizon % ls -l
total 88
-rw-r--r--@ 1 tsauerer  staff   1645 Jun 10 10:04 README.md
-rw-r--r--@ 1 tsauerer  staff  30267 Jun  9 10:45 main.tf
-rw-r--r--@ 1 tsauerer  staff    172 May 29 08:35 vars.tf
tsauerer@tsauerer-a01 VMC_Terraform_Horizon %
Let's test if Terraform is installed and working correctly, with "terraform init" we can initialize Terraform and provider plugins.
tsauerer@tsauerer-a01 VMC_Terraform_Horizon % terraform init

Initializing the backend...

Initializing provider plugins...

Terraform has been successfully initialized!

You may now begin working with Terraform. Try running "terraform plan" to see
any changes that are required for your infrastructure. All Terraform commands
should now work.

If you ever set or change modules or backend configuration for Terraform,
rerun this command to reinitialize your working directory. If you forget, other
commands will detect it and remind you to do so if necessary.
Success, Terraform initialized succesfully. Next we need to check if we have the correct nsxt-provider.
tsauerer@tsauerer-a01 VMC_Terraform_Horizon_Backup % t version
Terraform v0.12.24
+ provider.nsxt v2.1.0
Great, we have the nsxt provider applied.

I recommend to use Visual Studio Code or Atom, which I'm using.
I created a new Project in Atom and select the folder which we cloned from github.
3 Files are importent, first "main.tf", here you can find the code or what will be done.

"Vars.tf", a description file for variables.

And the most importent file, which we have to create, because there, you will store all your secrets "terraform.tfvars".
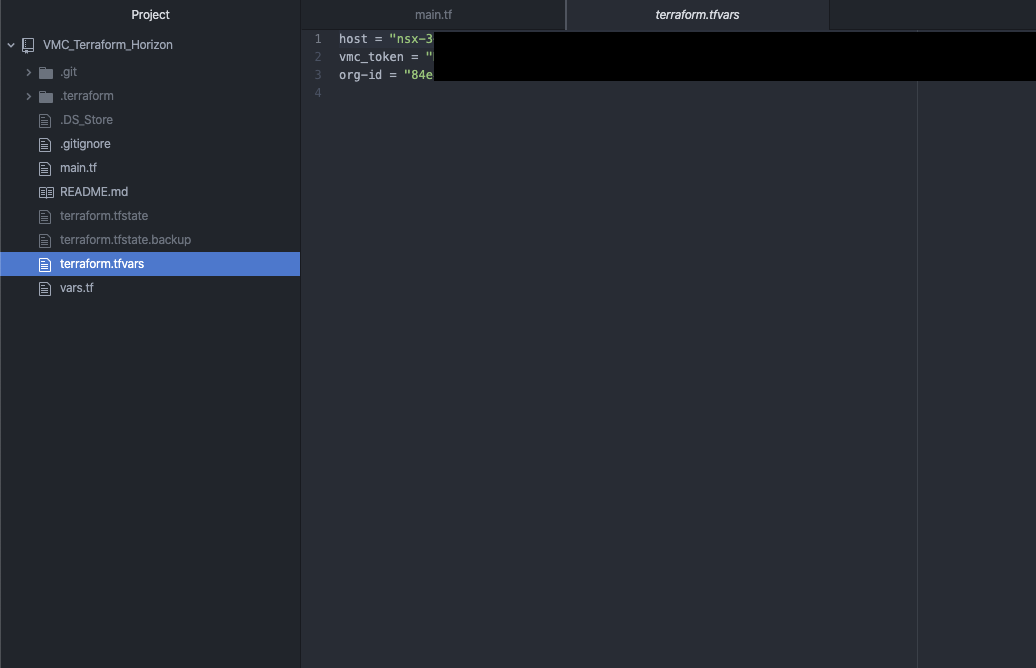
So what you have to do now, you need to create a new file and name it "terraform.tfvars". For NSX-T we only need 3 variables, we already saw them in the "vars.tf" file. So let's add
Host = ""
Vmc_token = ""
Org-id = ""
Don’t worry I will guide you where you can find all the informations. Let's find the Host informations. “Host” is kind of missleading in the world of VMware, what we need here is the NSX-T reverse proxy. Let's go to your SDDC and on the left side you can find "Developer Center"

Go to "API Explorer" choose your SDDC which you want to use and go to "NSX VMC Policy API". On the left the "base URL" is your NSX-reverse proxy URL.

Copy the URL and paste it to your "terraform.tfvars" file between the quotation marks. Here a small hint, because it took me some hour troubleshooting, you have to remove the "https://".. So it starts just with "nsx……..”
Host = "nsx-X-XX-X-XX.rp.vmwarevmc.com/vmc/reverse-proxy/api/orgs/84e"

Next we need our API Token. This token is dedicated to your Account, to create one, go to the top right, click on your name and go to "My Account".
On the last tab "API Token", we need to generate a new API Token.

Enter a Name, TTL period and your scope. I guess you only need "VMware Cloud on AWS" "NSX Cloud Admin", but I am not sure. My token had "All Roles". Generate the token, copy your generated token and safe it in a safe place! You will not be able to retrieve this token again.
vmc_token = "XXXXXXXXXXXXXXXXXXXXXXXXXXXXXXX"
Last we need the org-id. Just go to one of your SDDCs and look at the "support" tab, there you can find your org-id.
org-id = "XXXXXXXXX-XXXX-XXXX-XXXX-XXXXXXXXX"
If you working with github, I would recommend to create a .gitignore and add "terraform.tfvars", so it will not be uploaded to your repository. Take care about this file, all your secrets are inside :)! In the end your file should have 3 lines:
Host = "nsx-X-XX-X-XX.rp.vmwarevmc.com/vmc/reverse-proxy/api/orgs/84e"
vmc_token = "XXXXXXXXXXXXXXXXXXXXXXXXXXXXXXX"
org-id = "XXXXXXXXX-XXXX-XXXX-XXXX-XXXXXXXXX"
Perfect, we finished the preparation! We are ready to jump into "main.tf" file.
I creating 24 Services, 16 groups and 11 Distributed Firewall Sections with several Rules, in the end you will need to fill the groups with IPs/Ranges/Server. I only focused on Horizon related services, groups and firewall rules yet, so if you want to have a allowlist firewall enabled, you have to add core Services, Groups and Firewall Rules like DNS, DHCP, AD etc. I will try to keep on working on my code to add all necessary stuff for a allowlist firewall ruleset, but for now it should give you a idea how to do it and support your work.
But lets start to plan and apply the code. If you closed your Terminal window, reopen the terminal window, jump to our location and re-initialize terraform, with “terraform init”.
With the command “terraform plan” you can review everything what terraform wants to do and also you can check if you created your secret file correctly.

you can see terraform wants to create a lot of stuff. With “terraform apply” you will get again everything what terraform wants to create and you need to approve it with “yes”. Afterwards you fired “yes”, you can lean back and watch the magic.. After some seconds you should see: Apply complete! Resources: XX added, 0 changed, 0 destroyed.

Let’s take a look into VMC after we applied our changes. First of all we created groups…. and we got groups!

next we need to check services…. and we got services as well!

Now we come to our Distributed Firewall. Bunch of sections are created with several Rules in each section. I only created allow rules and all groups are empty, so no rule should impact anything!

Success :)! We applied Groups, Services and several Rules including Groups and Services. If you have any trouble or think you want to get rid of everything what Terraform did, you can just simple go back to your terminal and enter “terraform destroy”. It will check your environment what changed or what needs to be deleted, and give you a overview what terraform wants to/will do. Approve it with “yes” and all changes will be destroyed. It take some seconds and you will see: Destroy complete! Resources: XX destroyed.

If you have any questions, problems or suggestions feel free to contact me!
Some ending words about Terraform.. Terraform is a awesome tool in the world of automation.. I had no experience with programming but it took me one or two weeks to get into it and I had so much fun to write this code! It is super easy and super useful! I hope this code will help you, save you work and will provide you as much fun as I had :).
Integration Druva Phoenix Cloud to VMC on AWS
Updated: June 16th 2020
This blog post is ONLY a showcase. I want to show you, how easy a SaaS Backup Solution can be! We will securely implement it and backup a VM.

In this showcase we will use following Solutions:
Druva Phoenix SaaS Backup Solution
VMware Cloud on AWS
Distributed Firewall
About Druva:
Druva is a software company specialized on SaaS-based data protection in one Interface. It is build and born in the AWS Cloud. One of the Product is Phoenix Cloud. Let's talk about some benefits from Phoenix Cloud afterwards we will directly jump in and get deeper into Phoenix Cloud.
Phoenix backup everything in S3
Phoenix automatically archive older Backups to Glacier
You only pay for Storage you consuming after deduplication and compression
One Console for all Backups around the world
Up to over 15 Regions where Phoenix Cloud is available
And that are just a few benefits.
Let's dive in..
After we login to the Phoenix Cloud, the Console, is a very clean overview about your consumption and your environment. Druva provides a secure, multi-tenant environment for customer data, each customer gets a virtual private cloud (tenant). All data will be encrypted using a unique per tenant AES-256 encryption key. Above and beyond all security features what Phoenix Cloud provides, let's not forget about Druva is build in AWS. AWS provide significant protection against network security issues. You will find the full whitepaper about security here!

The first thing what we want to do, create a new Organization. It can be because of separate Departments, Regions etc. By the way Druva got a great permission management, each department can take care about there own Backups.
To create a new Org. we have to go to Organization and on the top left "Add New Organization", Name it and you created your first Org!

Afterwards go to your Org and Druva through you directly into a "Get Started”. We need to select a product, in our case VMware Setup.

Next we need to download the Backup Proxy, because we want to install it on VMC on AWS we need to download the standalone Backup Proxy. Keep on track, there’s something coming soon ;).
While the download is running we need to generate a new activation token for the installation of the proxy. You can set the count how many proxies you want to install and an expire time.

Copy your token, you will need it for the installation.
Now, before we can start to deploy the Proxy we need to check the network on VMC. Let’s go to the Compute Gateway Firewall first.
Druva Proxy needs 443 access to the vCenter and Internet access. So we create following rule on the compute Gateway:
Source: Druva-Proxy -> Destination: vCenter with Port: 443
Source: Druva-Proxy -> Destination: Any with Port: 443 applied to: internet interface

On the Management Gateway we need to open Port 443 as well. In- & Outbound.

Druva only needs access to the internet and to the vCenter, so why we shouldn't not restrict all other communication.
I wrote a Terraform script to automate this step, it will create groups, service and a distributed firewall section with 4 allow rules and 2 disabled deny rules. Repo can be found here. You just have to fill the created groups (Druva_Proxy, Druva_Cache & if needed SQL-Server).
All my test ran at a lab platform… Use above code at your own risk, I won't be responsible for any issues you may run into. Thanks!
If you prefer to do it by your own here are the manual steps:
Let's go to our Distributed Firewall.
My Demo Environment is set to blacklist. So our first Rules are:
Source: Druva-Proxy -> Destination: ANY with Service: ANY -> Reject!
Source: ANY -> Destination: Druva-Proxy with Serivce: ANY -> Reject!

Right now each traffic will be blocked directly on the vNIC of our Druva Proxy.
Perfect! Next we need to allow Internet traffic. This is trickier, because we using our internet gateway and do not using a classic proxy.
So we creating a RFC1918 Group, which includes all private IP Ranges and we need a negate selection. If you have a proxy Server just allow https traffic to your proxy, that should do the trick!
Source: Druva-Proxy -> Destination: is not! RFC1918 with Service 443 -> Allow!

Last Rules, we have to allow vCenter out- and inbound traffic. So we need 2 additional rules:
Source: Druva-Proxy -> Destination: vCenter with Service 443 -> Allow!
Optional you can add ICMP.
Source: vCenter -> Destination: Druva-Proxy with Service 443 -> Allow!

That’s pretty much it, our Application Ruleset! What we could do on the Infrastructure DFW Level, we could allow basic stuff like DNS etc. But Druva do not need anything else!
I will skip the Backup Proxy installation, it is pretty straight forward, choose Public Cloud, VMware Cloud on AWS and do the basic setup, like IP, Token , NTP, vCenter and your VMC credentials.
After the deployment is done, you will see your vCenter & VMs in Phoenix Cloud and also your Backup proxy is gathered in a Proxy Pool. With the latest version of the Backup proxy we are able to deploy new Proxies directly out of our Phoenix Console! Just go to your Backup Proxy Pool and hit deploy Proxies.

Choose your DataCenter & your Backup Proxy Pool, add as much as you want.
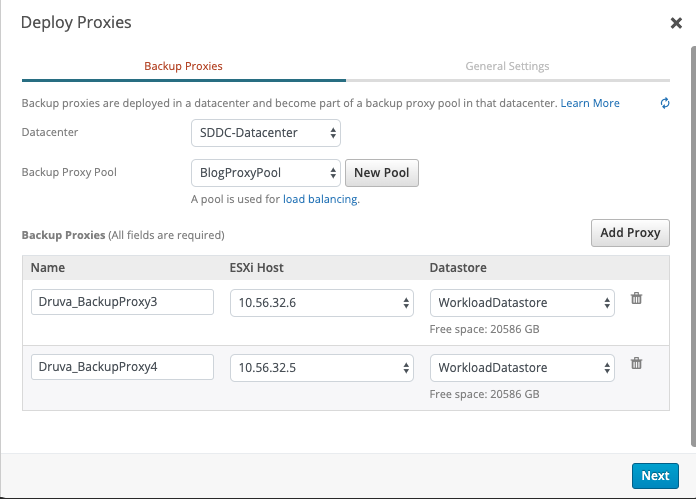
Configure the VM Network, a IP Range, Netmask, gateway and DNS Server. In my case I do not need any Proxy settings, if you using a Proxy just enable "use web proxy" and provide your information. Don't forget to add your newly deployed Proxies to your Firewall Group in VMC!

Now we have to create our first Backup Policy. You can find your Backup Policies via Manage -> Backup Policies. Let's create our own Policy with custom settings.

Create new Backup Policy -> VMware. First of all name it and write a description.

Schedule it, in our case each day at 02:00 am. Duration and your max bandwidth. You can separate weekdays and weekend, like me. On Weekend nobody works, so I extended the duration timer. It makes sense to ignore backup duration for the first backup. But I guess you know your Environment better than me.

Retention, in my case daily for 30 days, weekly for 24 weeks, monthly for 12 months and yearly snapshots for 10 years. Set it depending on your workload. I also enabled LTR (Long Term Retention). LTR automatically move all cold tier backups to Glacier.

Next some specific VMware Settings. Auto-enable CBT, VMware tools quiescing and application-aware processing.

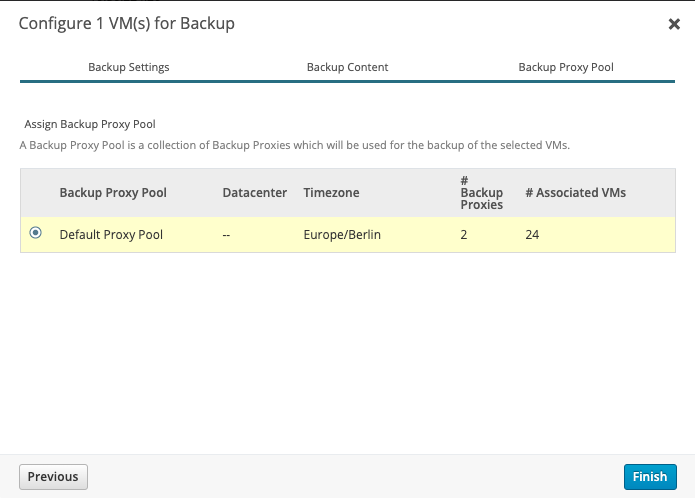
That's it! Meanwhile you should notice in your Phoenix Cloud Console, your Proxy communicates with Druva Phoenix Cloud and you see some Information of your vCenter. Next we need to configure VMs for Backup. Let's go to Protect -> VMware. Here you have an overview of # Total VMs, Configured VMs and your Backup Proxy Pools/# Backup Proxies.

To configure a VM we go to your vCenter/Hypervisor and select 1 or multiple VMs and select Configure VM for Backup.

Choose your Storage, in my case eu-central 1 (Frankfurt DataCenter) a Administrative Group (useful to organize/management purpose) and your Backup Policy what we created earlier. In my case BlogPolicy, if you have more Backup Policys, you always can see the Details after selecting a Backup Policy.

Next, you can exclude disk names, in my case we do not exclude disks, as an example could be useful for Database Server.

Select your Backup Proxy Pool and you good to go. Your Virtual Machine is now configured!
You will find your VM in "Configured Virtual Machines". To test it lets start a backup now. Select it, hit "Backup Now" and choose yes you really want to start now.

You will find your Job in Jobs -> VMware.

For detailed information you can press the Job ID and you can see a Summary and Progress Log, if something went wrong you can also download detailed logs here.

Above you can see the result! Our first Backup of our VM, we transferred nearly 19GB, with a speed of 196 GB/hr and the Backup Duration was under 10 minutes.
Some closing words, Druva Phoenix Cloud is a great SaaS Backup Solution! It is easy to use and on the other hand very detailed. Druva engineered a next-gen solution, which brings the backup world to the next Level.
I had the chance to get in contact with pre-sales, sales, support, engineering and product management. It was a pleasure for me, you felt in each of them, the love and passion for the product/solution.
Special Thanks to Martin Edwards, Saurabh Sharma, Anukesh Nevatia and the rest of the Druva Team!
VMware Carbon Black Cloud for Endpoint Security
The VMware Carbon Black Cloud is a cloud-native endpoint protection platform (EPP) that provides what you need to secure your endpoints, using a single lightweight agent and an easy to use console.

VMware Carbon Black provides:
Superior Protection
Actionable Visibility
Simplified Operations
We will secure our VMC on AWS Horizon Environment with Carbon Black endpoint protection.
First let's take a look on the Console. It is a web-based Console hosted in a AWS Datacenter (in different GEOs). You can login via SSO or E-Mail and Password, as well as 2FA with DUO Security / Google Authenticator. The Dashboard give you a good overview about what is going on, any events or issues, which can easily filtered per policy or day/weeks.
Carbon Black have a really great community, check it out! https://community.carbonblack.com/


Let's start to get CB rolling and define a policy group. In a policy group you can define all kind of settings, what should happen if something get's detected, or just simple things like, when should the system get scanned. To create a new Policy let's get to enforce -> policy.
Add a new Policy, name it, add a description and copy setting from the standard Policy Group. You are able to customize the message which the User will see, when carbon black blocked anything. In my case a picture of Carbon Black and they should contact me.
<table><tr><td><a href="https://www.carbonblack.com/"><img src="https://media.glassdoor.com/sqll/371798/carbon-black-squarelogo-1528288481334.png" width=32 height=32></a></td> <td> Contact Thomas Sauerer, he is your admin</td>

Let’s go to the next tab “prevention”. We can allow Applications to bypass Carbon Black so the client is able to use it. A common Application is Powershell. So we need to add a new Application path, enter the application path “**\powershell.exe” and select bypass if any operation are performed.

Blocking and Isolation, here we can decide what will happen if any known malware will be detected. In our case we want to terminate the process if it is running or start to run. Keep in mind you always have the ability to Test each single Rule, so you are able to test everything in a secure way without any business impact!
Next we can block Applications who are on the Company blacklist. Here we can be more specific. You are able to deny or terminate the communication over the network or you want block it if it injects any code or modifies memory of other processes. Like I mentioned before, test your rules, use this awesome feature!
Adware or PUP and Unknown application I choose to terminate process if it’s performs any ransomware-like behavior.

You also can change the local scans, On-Access File scan, frequency and more. Keep it in mind if you have to exclude any on-access scans on specific files/folders. You can change your Update Servers for offsite and internal devices. That is important if you have any mobile devices who are not directly connected. For different Regions it would make sense to change it to a local update server. Update-Server are reachable via https as well, just change it to https.

On the last, "Sensor" you can edit the sensor settings of the client. I will deploy CB to our demo and test environment, in this case I allow user to disable protection. Usually you will not allow the User to disable the security! Guess what, if user can disable it most of them will do.. Here you are able to activate the Sensor UI: Detailed message, which we defined earlier.

Next what we need to do is to create an Endpoint Group. In Endpointgroups you can define different policys or criteria to seperate different Workloads and assign them automatically to a policy. To do this, you have to go to "Endpoint" section on the left side and add a new group.

It makes sense to separate different Workloads as Horizon, WebServer etc. You can set different criteria like IP Range or Operating System to automatically add the Server to different Endpoint Groups.
Last step, we need to install the Carbon Black Sensor. Basically it should make sense to add the Sensor directly to the basic Images and also define a Default/general Endpoint Group where all clients are added with a basic ruleset. When you change, as an example, the IP address from the Server it will automatically update the Endpointgroup and add the Server to the new Policy Ruleset. In my case I will just install the Sensor manually.
To download the Sensor we need to go to Endpoints -> All Sensors on the top right you will find Sensor Options -> Download Sensor kits.

Run the installer on the target system, agree the terms and enter the License Key. We are done, the Sensor is installed! Take a look back to the Console "Endpoints", you can see now the VM automatically added to the correct group and policy.
IDS/IPS with NSX-T
VMware has announced a new NSX-T Version 3.0 on 7th of April 2020. This version is a major release with many new features. VMware added several new function in the areas Intrinsic Security, Operations, Multisite (Federation), Containers, Load Balancing Enhancements, VPN Enhancements, Routing, Automation and Cloud connectivity. I want to take a closer look within this blog post to the Intrusion Detection System/Intrusion Prevention System (IDS/IPS) feature.
Most companies are using IDS for the east-west security inside the data centre and IPS for the north-south security. For the release NSX-T 3.0 IDS is available, IPS will be provided with future releases.
What is a IDS/IPS system?
IDS/IPS systems can be implemented in hardware or software. IDS/IPS system protection is against vulnerabilities exploits which can be done as malicious attack to a application or service. Attackers use this to interrupt and gain control of the application. IDS/IPS technology rely on signatures to detect attempts at exploiting vulnerabilities into the applications. This signatures are comparable to regular expressions which compare network traffic with malicious traffic patterns.
IDS (Intrusion Detection System) is like the name already says an monitoring system and IPS (Intrusion Prevention System) is a control system which blocks the traffic in case a attack is detected. This means with IPS you have the risk of false positives.
How IDS runs with NSX?
As already mentioned with NSX-T 3.0 release VMware announced IDS (Intrusion Detection System) with NSX-T 3.0. IPS function will be provided in the next months.
IDS is hypervisor based and is sitting in front of the vNIC on the ESXi host (see picture 1). The design is based on the NSX DFW (Distributed Firewall) concept. No agent is necessary, the communication is realized via VMware tools. A VMware VIB (vSphere Installation Bundle) will be rolled out for the host preparation. With this technic you avoid hair-pin because instead of traditional firewall with IPS/IDS the function is covered directly on the host level without any dependency to the network or any IP address ranges.
The signatures will be provided from the cloud service provider Trustwave directly to the NSX Manager. For this purpose the NSX Manager needs internet access, offline downloads are also supported. The signature updates could be provided immediately, daily or bi-weekly.
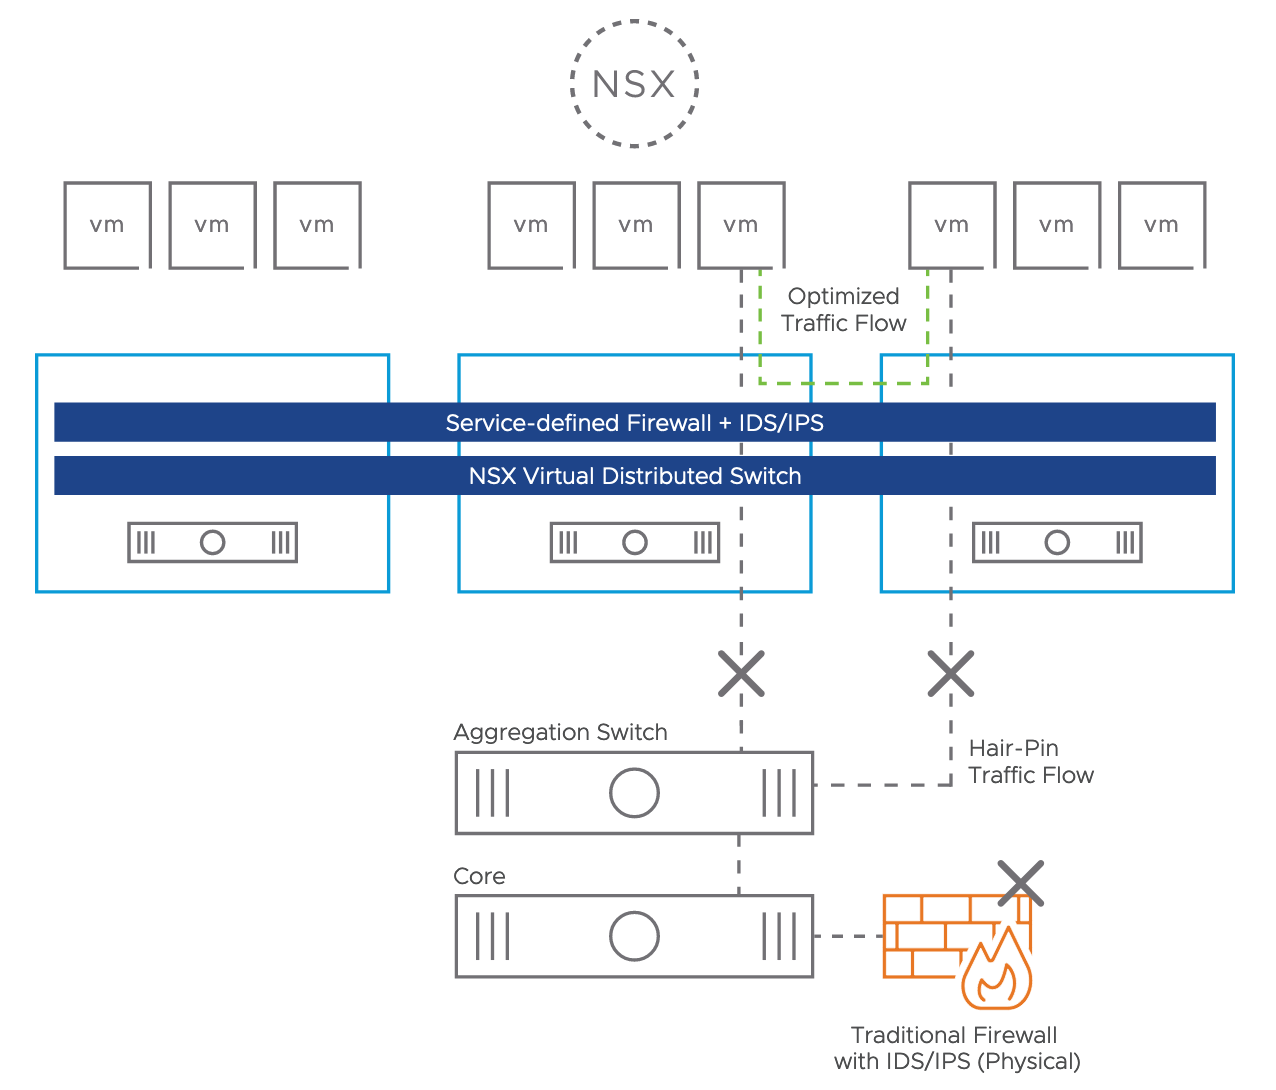
Picture 1: IDS System Hypervisor based
What are the use cases for IDS with NSX?
DMZ (Demilitarized Zone)
NSX IDS has the possibility to establish a DMZ (Demilitarized Zone) in software. One approach could be to realize this completely on the virtualization level or another choice could be to use dedicated ESXi Hosts for the DMZ. The NSX Distributed Firewall (DFW) and the Distributed IDS allow customers to run workloads centralized for different tenants.
Detecting Lateral Threat Movement
Usually the initial attack is not the actual objective, the attackers try to move through the environment to reach the real target. The NSX Distributed Firewall (DFW) with Layer-7 App-ID features helps there a lot that the attacker could not exploit the attack. For example the ransomware attack “WannaCry” is based on port 445 and 139 with SMB and could not be avoided with NSX DFW. With IDS technology the attack could be detected and would not be moved to other machines.
Replace physical IDS Systems
Another use case could be to remove the physical firewalls or IDS systems and replace it with NSX.
Meet regulatory compliance
Many data centre workloads have Intrusion Detection System (IDS) requirements for regulatory compliance, i.e. sensitive Health Insurance Portability and Accountability Act (HIPAA) for healthcare, and the Payment Card Industry Data Security Standard (PCI DSS) or the Sarbanes-Oxley Act (SOX) for finance.
How does IDS work with NSX?
The installation effort and the operational overhead is low when NSX is already implemented. There are only a few steps necessary to get the IDS function up and running.
1. Configure IDS Settings
The NSX-T Manager needs internet access to download the signatures, it could be done with auto-updates or manuel. It is also possible to define an Internet Proxy (HTTP/HTTPS). The VIB (VMware Installation Bundle) rollout can be realized via cluster or standalone ESXi Host (see picture 2).

Picture 2: Configure IDS Settings
2. Configure IDS Profile
The second step would be to configure an IDS Profile if you do not want to use the default profile (see picture 3). During this step Severities can be defined from Critical, High, Medium to Low which are based on CVSS (Common Vulnerability Scoring System) score.
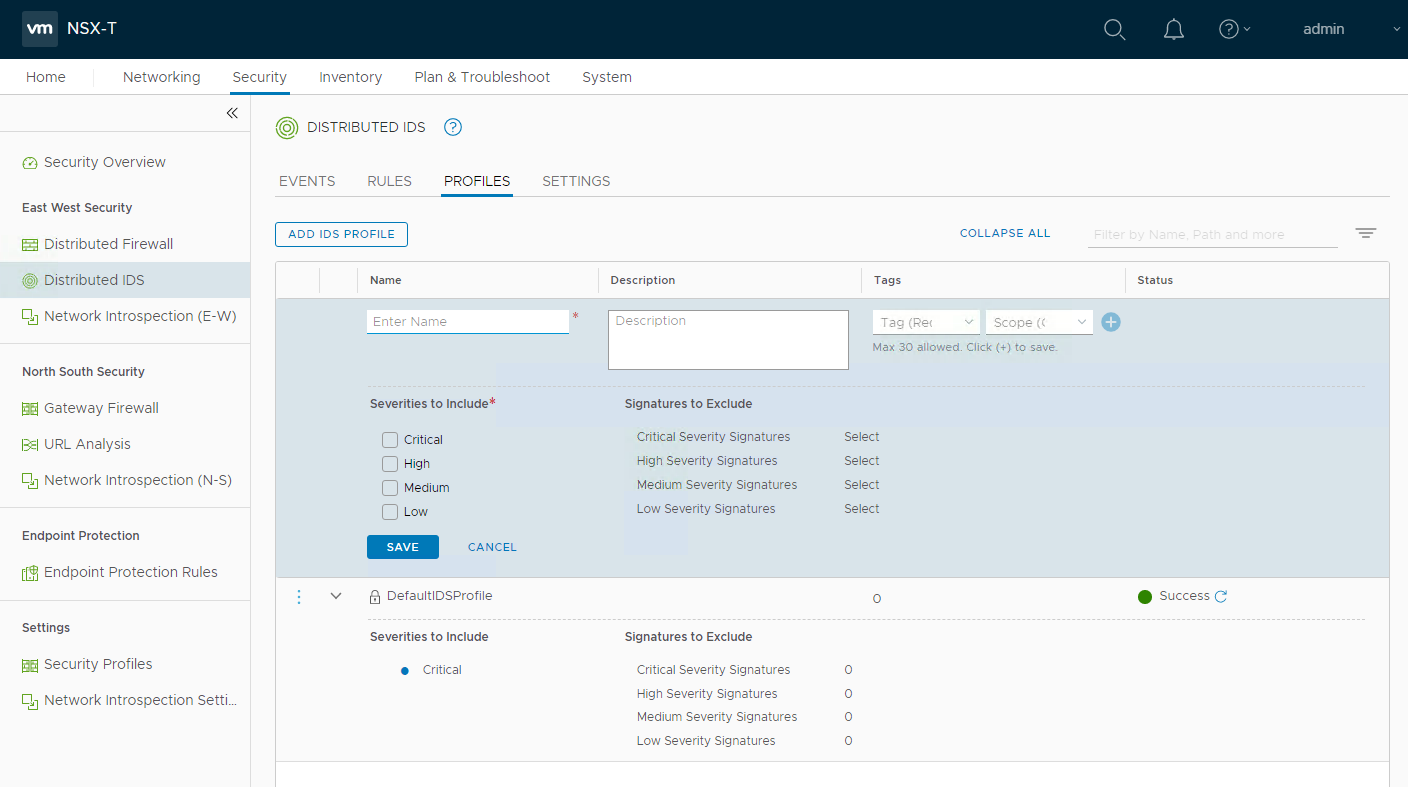
Picture 3: Configure IDS Profile
3. Configure IDS Rules
The last IDS configuration step will be to create an policy with IDS rules (see picture 4). The administration of IDS rules are very similar to the DFW firewall rules. A configuration of a IDS rules includes name, sources, destinations, services, IDS profile and the applied to field.

Picture 4: Configure IDS rules
4. Monitor IDS Events
When IDS is configured the events can be monitored over the dashboard which is visible below in picture 5.

Picture 5: Monitor IDS events
Summary
IDS (Intrusion Detection System) is another major step for NSX within the Intrinsic Security area. IDS in software, Distributed & Built-in Analysis, no hair-pinning traffic, meet regulatory compliance, fits DMZ requirements, no lateral thread movement and simple operations are all arguments to validate this new feature.
vExpert Program
Do you know the vExpert Program? As you use social media, read, post and blog for you and your company, the technology you believe in, you should go for it. This is a community for everybody interested in VMware knowledge. Here is a short overview:
Program Overview
The VMware vExpert program is VMware's global evangelism and advocacy program. The program is designed to put VMware's marketing resources towards your advocacy efforts. Promotion of your articles, exposure at our global events, co-op advertising, traffic analysis, and early access to beta programs and VMware's roadmap. The awards are for individuals, not companies, and last for one year. Employees of both customers and partners can receive the awards. In the application, we consider various community activities from the previous year as well as the current year's (only for 2nd half applications) activities in determining who gets awards. We look to see that not only were you active but are still active in the path you chose to apply for.
Criteria
If you are interested in becoming a vExpert the criteria is simple. We are looking for IT Professionals who are sharing their VMware knowledge and contributing that back to the community. The term "giving back" is defined as going above and beyond your day job. There are several ways to share your knowledge and engage with the community. Some of those activities are blogging, book authoring, magazine articles, CloudCred task writing, active in Facebook groups, forum (VMTN as well as other non VMware) platforms, public speaking, VMUG leadership, videos and so on.
vExpert Program Benefits
Invite to our private #Slack channel
vExpert certificate signed by our CEO Pat Gelsinger.
Private forums on communities.vmware.com.
Permission to use the vExpert logo on cards, website, etc for one year
Access to a private directory for networking, etc.
Exclusive gifts from various VMware partners.
Private webinars with VMware partners as well as NFRs.
Access to private betas (subject to admission by beta teams).
365-day eval licenses for most products for home lab / cloud providers.
Private pre-launch briefings via our blogger briefing pre-VMworld (subject to admission by product teams)
Blogger early access program for vSphere and some other products.
Featured in a public vExpert online directory.
Access to vetted VMware & Virtualization content for your social channels.
Yearly vExpert parties at both VMworld US and VMworld Europe events.
Identification as a vExpert at both VMworld US and VMworld EU.
Visit it here: https://vexpert.vmware.com/