Integration Druva Phoenix Cloud to VMC on AWS
Updated: June 16th 2020
This blog post is ONLY a showcase. I want to show you, how easy a SaaS Backup Solution can be! We will securely implement it and backup a VM.

In this showcase we will use following Solutions:
Druva Phoenix SaaS Backup Solution
VMware Cloud on AWS
Distributed Firewall
About Druva:
Druva is a software company specialized on SaaS-based data protection in one Interface. It is build and born in the AWS Cloud. One of the Product is Phoenix Cloud. Let's talk about some benefits from Phoenix Cloud afterwards we will directly jump in and get deeper into Phoenix Cloud.
Phoenix backup everything in S3
Phoenix automatically archive older Backups to Glacier
You only pay for Storage you consuming after deduplication and compression
One Console for all Backups around the world
Up to over 15 Regions where Phoenix Cloud is available
And that are just a few benefits.
Let's dive in..
After we login to the Phoenix Cloud, the Console, is a very clean overview about your consumption and your environment. Druva provides a secure, multi-tenant environment for customer data, each customer gets a virtual private cloud (tenant). All data will be encrypted using a unique per tenant AES-256 encryption key. Above and beyond all security features what Phoenix Cloud provides, let's not forget about Druva is build in AWS. AWS provide significant protection against network security issues. You will find the full whitepaper about security here!

The first thing what we want to do, create a new Organization. It can be because of separate Departments, Regions etc. By the way Druva got a great permission management, each department can take care about there own Backups.
To create a new Org. we have to go to Organization and on the top left "Add New Organization", Name it and you created your first Org!

Afterwards go to your Org and Druva through you directly into a "Get Started”. We need to select a product, in our case VMware Setup.

Next we need to download the Backup Proxy, because we want to install it on VMC on AWS we need to download the standalone Backup Proxy. Keep on track, there’s something coming soon ;).
While the download is running we need to generate a new activation token for the installation of the proxy. You can set the count how many proxies you want to install and an expire time.

Copy your token, you will need it for the installation.
Now, before we can start to deploy the Proxy we need to check the network on VMC. Let’s go to the Compute Gateway Firewall first.
Druva Proxy needs 443 access to the vCenter and Internet access. So we create following rule on the compute Gateway:
Source: Druva-Proxy -> Destination: vCenter with Port: 443
Source: Druva-Proxy -> Destination: Any with Port: 443 applied to: internet interface

On the Management Gateway we need to open Port 443 as well. In- & Outbound.

Druva only needs access to the internet and to the vCenter, so why we shouldn't not restrict all other communication.
I wrote a Terraform script to automate this step, it will create groups, service and a distributed firewall section with 4 allow rules and 2 disabled deny rules. Repo can be found here. You just have to fill the created groups (Druva_Proxy, Druva_Cache & if needed SQL-Server).
All my test ran at a lab platform… Use above code at your own risk, I won't be responsible for any issues you may run into. Thanks!
If you prefer to do it by your own here are the manual steps:
Let's go to our Distributed Firewall.
My Demo Environment is set to blacklist. So our first Rules are:
Source: Druva-Proxy -> Destination: ANY with Service: ANY -> Reject!
Source: ANY -> Destination: Druva-Proxy with Serivce: ANY -> Reject!

Right now each traffic will be blocked directly on the vNIC of our Druva Proxy.
Perfect! Next we need to allow Internet traffic. This is trickier, because we using our internet gateway and do not using a classic proxy.
So we creating a RFC1918 Group, which includes all private IP Ranges and we need a negate selection. If you have a proxy Server just allow https traffic to your proxy, that should do the trick!
Source: Druva-Proxy -> Destination: is not! RFC1918 with Service 443 -> Allow!

Last Rules, we have to allow vCenter out- and inbound traffic. So we need 2 additional rules:
Source: Druva-Proxy -> Destination: vCenter with Service 443 -> Allow!
Optional you can add ICMP.
Source: vCenter -> Destination: Druva-Proxy with Service 443 -> Allow!

That’s pretty much it, our Application Ruleset! What we could do on the Infrastructure DFW Level, we could allow basic stuff like DNS etc. But Druva do not need anything else!
I will skip the Backup Proxy installation, it is pretty straight forward, choose Public Cloud, VMware Cloud on AWS and do the basic setup, like IP, Token , NTP, vCenter and your VMC credentials.
After the deployment is done, you will see your vCenter & VMs in Phoenix Cloud and also your Backup proxy is gathered in a Proxy Pool. With the latest version of the Backup proxy we are able to deploy new Proxies directly out of our Phoenix Console! Just go to your Backup Proxy Pool and hit deploy Proxies.

Choose your DataCenter & your Backup Proxy Pool, add as much as you want.
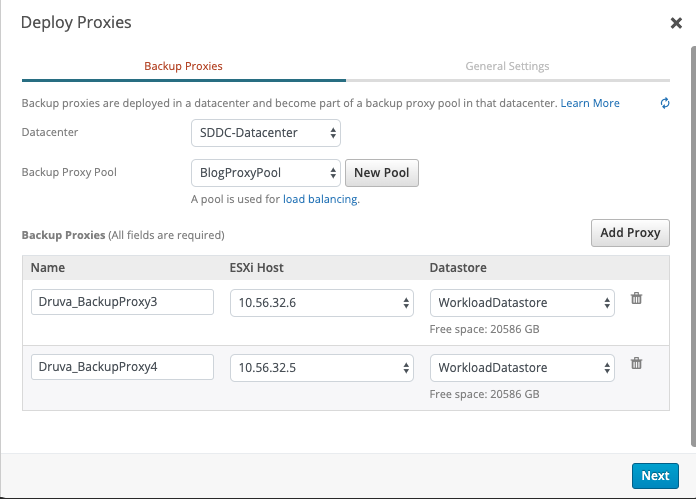
Configure the VM Network, a IP Range, Netmask, gateway and DNS Server. In my case I do not need any Proxy settings, if you using a Proxy just enable "use web proxy" and provide your information. Don't forget to add your newly deployed Proxies to your Firewall Group in VMC!

Now we have to create our first Backup Policy. You can find your Backup Policies via Manage -> Backup Policies. Let's create our own Policy with custom settings.

Create new Backup Policy -> VMware. First of all name it and write a description.

Schedule it, in our case each day at 02:00 am. Duration and your max bandwidth. You can separate weekdays and weekend, like me. On Weekend nobody works, so I extended the duration timer. It makes sense to ignore backup duration for the first backup. But I guess you know your Environment better than me.

Retention, in my case daily for 30 days, weekly for 24 weeks, monthly for 12 months and yearly snapshots for 10 years. Set it depending on your workload. I also enabled LTR (Long Term Retention). LTR automatically move all cold tier backups to Glacier.

Next some specific VMware Settings. Auto-enable CBT, VMware tools quiescing and application-aware processing.

That's it! Meanwhile you should notice in your Phoenix Cloud Console, your Proxy communicates with Druva Phoenix Cloud and you see some Information of your vCenter. Next we need to configure VMs for Backup. Let's go to Protect -> VMware. Here you have an overview of # Total VMs, Configured VMs and your Backup Proxy Pools/# Backup Proxies.

To configure a VM we go to your vCenter/Hypervisor and select 1 or multiple VMs and select Configure VM for Backup.

Choose your Storage, in my case eu-central 1 (Frankfurt DataCenter) a Administrative Group (useful to organize/management purpose) and your Backup Policy what we created earlier. In my case BlogPolicy, if you have more Backup Policys, you always can see the Details after selecting a Backup Policy.

Next, you can exclude disk names, in my case we do not exclude disks, as an example could be useful for Database Server.

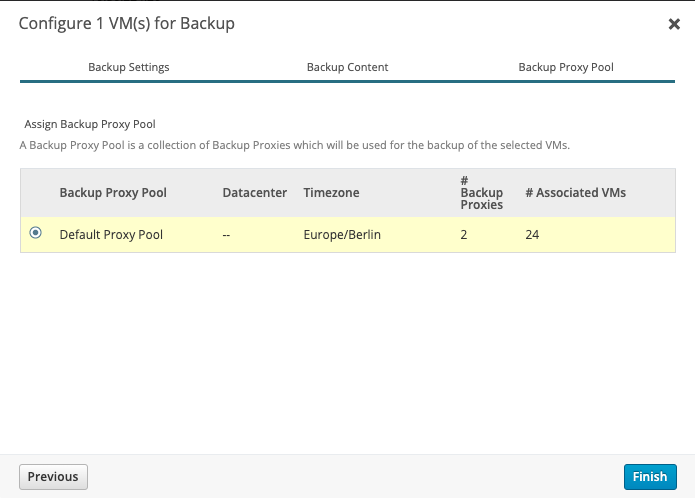
Select your Backup Proxy Pool and you good to go. Your Virtual Machine is now configured!
You will find your VM in "Configured Virtual Machines". To test it lets start a backup now. Select it, hit "Backup Now" and choose yes you really want to start now.

You will find your Job in Jobs -> VMware.

For detailed information you can press the Job ID and you can see a Summary and Progress Log, if something went wrong you can also download detailed logs here.

Above you can see the result! Our first Backup of our VM, we transferred nearly 19GB, with a speed of 196 GB/hr and the Backup Duration was under 10 minutes.
Some closing words, Druva Phoenix Cloud is a great SaaS Backup Solution! It is easy to use and on the other hand very detailed. Druva engineered a next-gen solution, which brings the backup world to the next Level.
I had the chance to get in contact with pre-sales, sales, support, engineering and product management. It was a pleasure for me, you felt in each of them, the love and passion for the product/solution.
Special Thanks to Martin Edwards, Saurabh Sharma, Anukesh Nevatia and the rest of the Druva Team!